I'm going to recap our complete stock tank vegetable and flower garden build sequence here so that any blog visitors from the e-ether won't have to sift through a multitude of my different garden posts, many of which are personal and anecdotal, in order to find the basic facts of this project (and if you decide after reading that you like this stuff, we also have a post called "Rainwater harvesting from start to finish" that you may want to check out).
DISCLAIMER: I have limited local gardening experience, although I DID stay at a Holiday Inn Express last night. I wrote this blog entry to compile information that might be of use for urban and suburban homeowners, particularly those on the upper Texas coast and similar subtropical environments, who would like to incorporate productive, limited-space, "architecturally-appropriate" gardens into their landscaping using stock tanks or other large structures, but who might not have the time or energy to run down all this information themselves. Here, I pull together the best knowledge I've obtained from internet investigations, a public horticultural class sponsored by a local university, market research, and interviews with local gardeners and vendors. You might think that making a stock tank garden simply involves throwing some soil in a big container and shoving plants into it, but there's really a heck of a lot more to it than that if you want to maximize your chances of success. I'm relating personal experience and opinions only here for the purposes of commentary; other people might have different and quite possibly superior ideas on this same subject. This is a noncommercial post; none of the vendors named herein has given me any consideration in exchange for citing them.
(1) THE IDEA OF USING LARGE STOCK TANKS AS GARDENS.
I've had this idea for years, and when I saw that Houston City Hall recently put in stock tank gardens, I decided the time was right for us to try it as well.
(2) STOCK TANK RATIONALE AND SOURCING.
I emailed a few people within City of Houston and Urban Harvest, the nonprofit team member on the garden venture pictured above, but nobody would 'fess up as to what brand of stock tanks those are, or where they got them. Little did I know at that time, but this reluctance to disclose materials sources would characterize our garden-building experience from start to finish (but I rectify that in spades in this post).
After a lengthy internet search, I settled on Behlen Country galvanized round stock tanks. They appeared well-made to me, and they add a contemporary design element with their bands and side-ribbing. The construction of our house was completed in February 2010, and we've got the trendy stainless-steel theme happening in the kitchen appliances, light, plumbing and hardware fixtures, etc. It made sense to balance this out by also incorporating some steel into the exterior landscaping design.
Plus, I have a rule for residential property modifications: even if improvements are nonconformist and unusual, they must add some monetary value, recouping at least a fraction of our original investment. If I had dug something that the less-earthy-among-us would consider to be a hillbilly hole of a garden in our back yard, it would have cost less, but it correspondingly would have detracted from the appraised value of our thoroughly-suburban property (we would have had to plow it under and re-sod in order to sell the place... not that we are planning to sell any time soon, but life can take unexpected turns). The above-ground steel tanks are more sophisticated and versatile - they could be used either passively or actively to grow vegetables, flowers, roses, shrubs, etc. and thus would appeal to many potential buyers as an asset rather than a liability.
I also believe that stock tanks will better accommodate our limited space and family lifestyle. A conventional row garden installed just above grade would have intruded upon our play areas and would have naturally invited our dog into it, both to scratch at the plants and to relieve herself (we don't have enough space to cordon off a dedicated garden area). She is trained not to jump on furniture, however, and I have a high degree of confidence that we will be able to keep her from jumping into the tanks for the fulfillment of either purpose. Stock tanks also reduce the hands-and-knees work, raising the planting surface to more accessible heights for adults and children.
(3) STOCK TANK VENDOR AND LOGISTICS.
The Behlen Country tanks were conveniently sold by American Fence and Supply, which has a store about two miles from us, and whose salespeople I found to be really helpful. The tanks themselves cost about $220 for the 6-foot diameter model (we got two of those), and $160 for the 4-footer. We rented a small U-Haul trailer for about $20 in order to get them home.
(4) DRAINAGE-NESS IS NEXT TO GODLINESS.
Now, as far as the actual engineering of the garden installations, this is where it got a bit dicey. I found almost nothing in the way of useful precedent on the internet. There is a very pretty blog entry about the Lady Bird Johnson Wildflower Center's recent stock tank garden addition (two separate URLs there), but no technical details were provided about how they were installed (the importance of the installation will become apparent in a few more paragraphs). Furthermore, the climate of Austin, Texas bears little resemblance to that of greater Houston despite its proximity. There were plenty of posts about using stock tanks for bog gardens and ponds, but very little about growing edibles in them. One commercial entry described a bit about installation of them for vegetable gardening, but that was geared toward use in the desert southwest.
One of our biggest challenges on the upper Texas coast is RAIN. As if to emphasize this point, Mother Nature delivered MORE THAN SIX INCHES! of the stuff (my rain gauge overflowed at 5 inches) in less than 3 hours in the early morning of November 2, after we had purchased the stock tanks but before we installed them. This temporarily turned them into wading pools.

So drainage is a critical issue both for the tanks, and for the landscape itself. In fact, we had to arrange the tanks so as to not interfere with a broad drainage swale that cuts across our backyard on the diagonal.
Here's where we gritted our teeth and plugged our ears, taking perfectly good expensive water-tight stock tanks and peppering them full of drainage holes.
(5) SOIL, SOIL, TOIL AND TROUBLE
(OR, THE DIRT ON DIRT).
And now for the discussion about soil, which has been the most frustrating part of this whole job.
I took a six-hour vegetable gardening course through Texas AgriLIFE Extension Service a few weeks ago (if you want to divert and read more detail about that class, you can access a blog entry here). In that course, the instructors stressed soil, soil, soil the way real estate agents chant location, location, location.
Only trouble was, soil with the composition and virtues that they so passionately extolled basically does not exist in our area.
The sad story goes like this. We cannot grow much of anything except weeds and Yaupon in our native soils because they are very poor "gumbo" clay soils and because they drain so poorly. Therefore, the only way to establish a decent garden is to build it on top of native soils using "created" soils with the proper physical, chemical, and biological characteristics.
I guess I'm a spoiled American because, when I hear about a commodity such as "garden soil", I expect to be able to march right out and purchase it from some convenient retail location which is open seven days a week. If I don't know where a good retailer is located, I naturally expect that simply asking someone who is in-the-know will yield the information I need.
Not so with soil. I think I would have had an easier time determining where and how to buy crack cocaine. The Galveston and Harris County Extension agents were not able to advise me - this much I expected, because their public service role requires them to be impartial. But I also found that the local Master Gardeners seemed equally reluctant to talk. I felt like screaming, "Honestly, I'm not an industry spy gathering market data! I'm just a suburban newbie who is trying to fill some tanks with nice dirt!"
I have a basic rule of thumb for anything having to do with landscaping in greater Houston: if it's not strictly within the scope of Randy Lemon's expertise (he concentrates mostly on ornamental landscaping), and if I can't find the answer anywhere else, I go to Maas Nursery. It will rarely be the most economical route because top quality does not come cheap, but they WILL have an answer to whatever the issue is. And so it was on the issue of stock tank soil: one of their salespeople recommended that I use commercially-available gardening soil from any of the local yards, but that I but amend it with both Cotton Burr Compost and Microlife fertilizer. So I bought 12 cubic feet of the former and 80 pounds of the latter.
After visiting about four local soil yards, I chose Living Earth Technology as the soil vendor. While their "ultra" soil (about $28 per cubic yard) appeared to my un-trained eye to have an undesirably large fraction of wood fragments (decomposition of wood sucks nitrogen from the soil and correspondingly robs the plants of it, as this very useful local blog post describes), at least they DID know the difference between sharp sand and bank sand. Their "ultra" soil was actually reported by the salesperson to contain masonry sand, but at least it isn't bank sand, which was reported by the Extension agent as being too full of native weed seeds to be of much use for vegetable gardening.
If you live on the north side of Houston, reportedly Nature's Way is THE place to go for gardening materials; several of my electronic and human sources alleged that they are the best vendor (and in fact they've won awards to that effect). But we are about 70+ miles from them, which would have made delivery costs prohibitive. I decided to go with the Maas salesperson's recommendation (Maas Nursery actually sells some of Nature's Way's soil, but I believe it was about $100 per cubic yard, which I found to be prohibitive for our size of project, thus the salesperson's alternative suggestion of using 'regular' garden soils with the aforementioned amendments).
(6) THE FILL
I wanted about 3 inches of freeboard available at the top of my tanks, and therefore I filled them to the very top, even after climbing in and gently grape-stomping some (but not all) of the air out of the soils. I expect that gravitational compaction and natural organic breakdown will reduce the volume by at least another 10% in short order.
I concentrated most of the Microlife and Cotton Burr compost in the top 12 inches.
(7) THE PLANTS
When we moved into our house about six months ago, I picked up some generic starter herbs at the local Lowes Hardware, and grew them in pots to get the roots established, with a future eye toward transferring them to these tanks.
In the weeks preceding the completion of the first two stock tanks, I visited the Clear Lake Shores Farmers Market and found a micro-business known as Faith's Garden Shed "Naturally". From the most cheerful proprietor, I bought more herbs and some vegetable starts. She also sold me some wonderful flowering plants that would be appropriate in terms of color, growth size, and sun tolerance when used as central ornamentals.
(8) THE RESULTS
(9) THE FINAL TAB
Major expenditures for this project were roughly as follows :
(a) Labor: you'll notice that we have no labor costs listed above. That's because we did it all ourselves.
DANGER, WILL ROGERS - if you are not physically fit by virtue of a rigorous existing exercise regime, you will hurt or kill yourself if you attempt this type of project without assistance. The materials listed above weigh about ten thousand pounds, and moving them is no small feat. I'm no spring chicken, but I exercise seriously and can swim a 22-minute kilometer without breathing hard. Even at my fitness level, this garden project wore me out! (which was half of my purpose in doing it - exercise is a habit of mine that has got to be fed). At the first snowfall every winter in my native Nova Scotia, I used to turn on the radio because I knew that they'd announce the local death statistics: the people who gave themselves heart attacks by shoveling snow from their driveways without first working up to the level of fitness that the task required. Well, soil and rock are the Houston equivalent of snow.
(b) Aggravations: Other than sourcing the soil, there were very few aggravations on this project. The main aggravation involved the Microlife organic fertilizer. It seems to be a great product, but guess what? It contains alfalfa, fish meal, bone meal, and other natural substances. Does that combination remind you of anything besides fertilizer? If you said dog food, you win a prize!! It turns out that our dog will dig up every little bit of it that I inject into our landscaping (beneath shrubs and whatnot) and eat both it and the soil it's mixed with. Not only does this cause me to lose all the hard work I expended on my fertilization efforts, I then have to deal with all the residual soil that re-emerges from the dog's rear end (resulting in about 3 times the normal volume of feces, as if we weren't having to pick up enough as it was). I wrote an email to the company that makes Microlife, and they responded that they are aware of this issue, noting that some dogs do become "addicted" (their word) to the stuff. There's nothing they could do about this without degrading their product, so it is what it is. I can't watch the dog every second that I'm outdoors, so I'm going to try applying a bitter spray and/or a garlic spray (both sold in pet stores) to the fertilized areas to see if that will dissuade her.
Of course, there's the potential for future aggravation if our plants won't grow after all this effort and expense, but I foresee myself respecting a natural learning curve there. If it turns out that we have problems with the soil even after adding compost and Microlife, I guess we'll just have to keep iterating with additional amendments and fertilizers.
Happy gardening!
;-)
Alison
alison.journey
at
gmail.com
***POSTSCRIPT, MARCH 8, 2011***
I thought I'd provide an update here on the same post because I can tell from the internet traffic that this information is probably being useful to some folks.
We newbies have been delighted by the success and productivity of these gardens!!
Broccoli is now one of my favorite things on earth because I get to have my plant and eat it too: I had no idea it would produce this profusion of yellow flowers.
Of course, we DID eat some of the crowns before letting the balance go to bloom:
Anyway, the verdict is, we highly recommend stock tank gardens!! Easy to build, easy to maintain, a feast for the senses, and not once has our dog attempted to jump into them!
***POSTSCRIPT, MAY 11, 2011***
Here below is the current state of the organic onion crop. I realize now that we could grow a heck of a lot of food in a six-foot stock tank, if we had to:

One day's harvest of organic cherry tomatoes, representing contributions from three vines planted in a six by two foot (169 gallon) round-end Behlen Country stock tank that was not featured in the original blog post above (we installed that one in a narrow side-yard, where its long skinny shape was more appropriate). As of right now, our rate of tomato harvest exceeds the rate at which our family is able to consume them:

By the way, thanks to everyone for making this post one of the highest-ranked stock tank garden information sites on the internet! (Because of the way Google works, you'll see different rankings based on your geographic area and internet traffic patterns). If I've helped people across the world with their own gardening projects, then all the time and energy that went into this post has been well worth it!
:-)

***POSTSCRIPT, MAY 3, 2011***
FYI, in the spirit of urban homesteading, we now have a companion post to this entry for a new gardening project:
"Watergarden from start to finish".
*** POSTSCRIPT, JUNE 5, 2011***
I wanted to provide an update regarding the economics of the stock tanks, because the results have been surprising to me. We did this garden project for the love of it, not to recoup our investment, but the financial aspect is interesting in its own right, so here goes.
So far I calculate that we have saved about $125 in groceries by virtue of the stock tank harvest, here in the first eight months or so of experimentation. When I took the gardening class from the local Ag Extension office, the instructor stressed that home gardening did not have good prospects for becoming effectively cash-flow positive. But that instructor was talking about conventional costs, whereas we buy organic at 2x to 3x the cost of conventional produce. That becomes a different equation.
Furthermore, we have 16 pounds of onions drying on the shelves above our fridge. This morning in Walmart, organic onions are going for $1.50 per pound, so those onions represent at least another $24 saved. Plus there's probably another 10 pounds of onions still outside in the first stage of sun-drying. And another 3 pounds of tomatoes that we have not yet used (we cook intensively, so we will use all of them).
So we're seeing at least 13% of the original tank-building investment recouped in less than a year - and we didn't even try. This was entirely an experimental year for us. And that figure of 13% recoup does not include the gas and time I saved by NOT having to run to the grocery store numerous times.
In sum, I'm impressed. If a gardener wanted to focus on return-on-investment, I'm convinced that these tanks could be made to pay for themselves within a few years.
Something else to consider regarding our yields: we had everything working against us. So far this year, Houston has gone through the coldest February on record followed by the worst drought in recorded history. Weather conditions are so bad here that the National Weather Service actually dissolved into uncharacteristically flowery language two days ago, noting that the City of Houston has entered "uncharted territory" with respect to the severity of its weather.
And through this persistent meteorological nightmare, we have actually raised about $160 worth of near-organic food, including a set of three vines that produced more than 500 (five hundred!!) cherry tomatoes - but those vines never once saw a drop of natural rain. All their water came from the municipal supply emanating from the end of my garden hose, chlorine residual and all. So I wonder what might have been possible if we'd had even remotely normal weather during this time??
Right now, because of the drought and the absolutely stunning high temperatures that have come with it, we have moved into "temporary-repurpose" mode.
 I've got those three sunflowers that I raised from seeds in the middle of this tank, and some hardy ornamentals decorating the remainder. And the rocks.
Now that we have 100 degree temperatures almost every day and no rain whatsoever for months, I'm experimenting with new ways to slow the incredible evaporation that is occurring from the tanks. I covered part of the surface with loose flat landscape rocks to shield the soil from direct sun. When conditions abate and I can resume with more vegetables, I can simply set the rocks aside for later use. Meanwhile, we think they look very cool. We are sorta turning the tank into an art object of steel, stone, and flowery splendor.
As I write this, we are 12 degrees above normal and 5 degrees above the previous record-high temperature. I think I better go pull in some more of our tomatoes.
;-)
DISCLAIMER: I have limited local gardening experience, although I DID stay at a Holiday Inn Express last night. I wrote this blog entry to compile information that might be of use for urban and suburban homeowners, particularly those on the upper Texas coast and similar subtropical environments, who would like to incorporate productive, limited-space, "architecturally-appropriate" gardens into their landscaping using stock tanks or other large structures, but who might not have the time or energy to run down all this information themselves. Here, I pull together the best knowledge I've obtained from internet investigations, a public horticultural class sponsored by a local university, market research, and interviews with local gardeners and vendors. You might think that making a stock tank garden simply involves throwing some soil in a big container and shoving plants into it, but there's really a heck of a lot more to it than that if you want to maximize your chances of success. I'm relating personal experience and opinions only here for the purposes of commentary; other people might have different and quite possibly superior ideas on this same subject. This is a noncommercial post; none of the vendors named herein has given me any consideration in exchange for citing them.
(1) THE IDEA OF USING LARGE STOCK TANKS AS GARDENS.
I've had this idea for years, and when I saw that Houston City Hall recently put in stock tank gardens, I decided the time was right for us to try it as well.
 |
| This pic is from the URL given above. There are several design elements that differ between this set-up and ours, however, and that'll become apparent in this post. |
I emailed a few people within City of Houston and Urban Harvest, the nonprofit team member on the garden venture pictured above, but nobody would 'fess up as to what brand of stock tanks those are, or where they got them. Little did I know at that time, but this reluctance to disclose materials sources would characterize our garden-building experience from start to finish (but I rectify that in spades in this post).
After a lengthy internet search, I settled on Behlen Country galvanized round stock tanks. They appeared well-made to me, and they add a contemporary design element with their bands and side-ribbing. The construction of our house was completed in February 2010, and we've got the trendy stainless-steel theme happening in the kitchen appliances, light, plumbing and hardware fixtures, etc. It made sense to balance this out by also incorporating some steel into the exterior landscaping design.
Plus, I have a rule for residential property modifications: even if improvements are nonconformist and unusual, they must add some monetary value, recouping at least a fraction of our original investment. If I had dug something that the less-earthy-among-us would consider to be a hillbilly hole of a garden in our back yard, it would have cost less, but it correspondingly would have detracted from the appraised value of our thoroughly-suburban property (we would have had to plow it under and re-sod in order to sell the place... not that we are planning to sell any time soon, but life can take unexpected turns). The above-ground steel tanks are more sophisticated and versatile - they could be used either passively or actively to grow vegetables, flowers, roses, shrubs, etc. and thus would appeal to many potential buyers as an asset rather than a liability.
I also believe that stock tanks will better accommodate our limited space and family lifestyle. A conventional row garden installed just above grade would have intruded upon our play areas and would have naturally invited our dog into it, both to scratch at the plants and to relieve herself (we don't have enough space to cordon off a dedicated garden area). She is trained not to jump on furniture, however, and I have a high degree of confidence that we will be able to keep her from jumping into the tanks for the fulfillment of either purpose. Stock tanks also reduce the hands-and-knees work, raising the planting surface to more accessible heights for adults and children.
(3) STOCK TANK VENDOR AND LOGISTICS.
The Behlen Country tanks were conveniently sold by American Fence and Supply, which has a store about two miles from us, and whose salespeople I found to be really helpful. The tanks themselves cost about $220 for the 6-foot diameter model (we got two of those), and $160 for the 4-footer. We rented a small U-Haul trailer for about $20 in order to get them home.
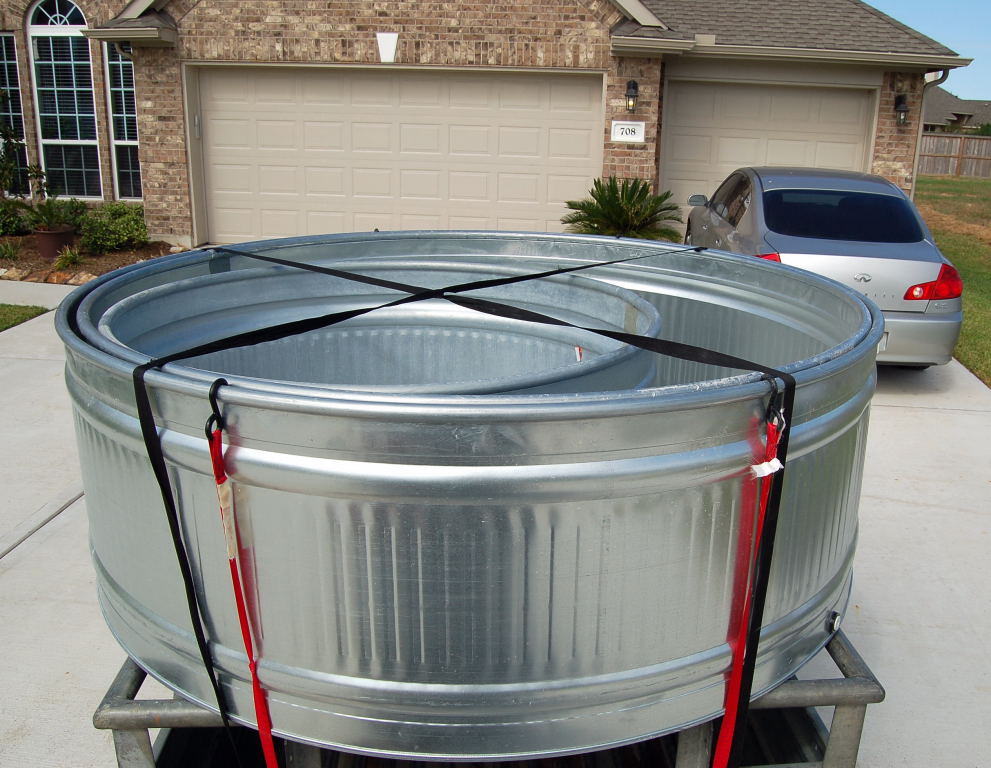 |
| Three tanks nested: Behlen makes the 6-footers in slightly-descending diameters so that they can ship inside of each other. We mounted them flush on top of the trailer instead of angling them in because we were worried that they might warp if all the weight were placed on one edge... the 6-footers are about a hundred pounds apiece. |
 |
| For much of this process, I felt like I was INVENTING the wheel, so it's only fitting that we rolled our stock tanks LIKE wheels into position. Fortunately, the land to the east of us has not been sold yet, so we put a temporary hinge on a section of our fence so that we could take all the landscaping supplies into the back yard that way - much easier than trying to maneuver through a foot gate and around the side of the house. |
Now, as far as the actual engineering of the garden installations, this is where it got a bit dicey. I found almost nothing in the way of useful precedent on the internet. There is a very pretty blog entry about the Lady Bird Johnson Wildflower Center's recent stock tank garden addition (two separate URLs there), but no technical details were provided about how they were installed (the importance of the installation will become apparent in a few more paragraphs). Furthermore, the climate of Austin, Texas bears little resemblance to that of greater Houston despite its proximity. There were plenty of posts about using stock tanks for bog gardens and ponds, but very little about growing edibles in them. One commercial entry described a bit about installation of them for vegetable gardening, but that was geared toward use in the desert southwest.
One of our biggest challenges on the upper Texas coast is RAIN. As if to emphasize this point, Mother Nature delivered MORE THAN SIX INCHES! of the stuff (my rain gauge overflowed at 5 inches) in less than 3 hours in the early morning of November 2, after we had purchased the stock tanks but before we installed them. This temporarily turned them into wading pools.

So drainage is a critical issue both for the tanks, and for the landscape itself. In fact, we had to arrange the tanks so as to not interfere with a broad drainage swale that cuts across our backyard on the diagonal.
 |
| I got some serious criticism of this arrangement from one local hard-core gardener to whom I'd showed this picture. He thought that the aesthetics would be dramatically improved if the tanks were clustered together rather than dispersed, but the shape, size, and drainage of our back yard really would not allow that to work, we believed. The drainage swale basically runs in a line that would connect the two roof shadow points you see here. Nothing can block that swale. We also need to leave the central area open so that we can have room to play with the dog you see flaked out on the grass there in the middle. The back yard is 70 feet wide but only 39 feet deep in the foreground, 22 feet deep off the back patio. Our layout choices were limited. |
 |
| This drill bit was an unexpected expense at about $45. As reported in one of the URLs given in paragraph (4), you could also try using a pointed metal bar to punch holes, but we didn't want to tear up the bottoms, especially since we needed at least one clean hole per tank to run irrigation lines through. |
 |
| Holed tank. You can see the tentative layout for the support ring in the background. |
 |
| Initially I did not want to complicate the clean lines of the tanks by adding a base, but we needed to engineer the drainage for that worst-case rain scenario (plus Lawrence is taller than I am, and wanted the tanks to be set as high off the ground as possible). Equally importantly, we needed to LEVEL the tanks and so we needed a solid substrate upon which to do that. Leveling is a step that they did NOT appear to take in the City of Houston installation described in paragraph (1) (at least, the tanks don't look level to me in the photos), but any time you install any structural feature that is not level, plumb and true, you will eventually have problems. When full of watered soil and rock, these tanks are incredibly heavy - even the four-footer approaches fifteen hundred pounds, and that's enough to seriously deform the underlying soil unless it's properly supported. We found these generic cement retaining-wall blocks for about $1.73 apiece at Walmart and used construction sand as a leveling filler. Our dog kept a constant vigil as the strips of sod were removed, because she loves eating the grubs that live in the root zone. :-) |
 |
| Once upon a time, Lawrence was the youngest person in the state of Texas to hold an irrigator's license (back when it was a more profitable way to earn teenage spending money than sacking groceries). Our irrigation system is currently under design and will be installed at some future point but, for now, we stubbed out the lines to each tank. This requires some headwork because order of operations is important. You have to be able to install the stub but then remove the tank to place the rest of the drainage base, as the next photos will show. For ease of removal and replacement, we clipped the stub short after initially placing it. |
 |
| Gravel (about $65 per cubic yard, with one yard being more than sufficient to underlay all three tanks plus add layers into the bottom of each tank for aeration and drainage) filled the inside of the cement block ring. Once the gravel is poured in, it is best to stomp it with a twist like you're putting out cigarette butts, in order to compact and lock together the individual stones. A board can then be dragged across to smooth and level it. |
 |
| If you want to strike terror into the heart of any Houstonian, all you need to do is utter the word "ants". I doubt that anything could ever totally stop fire ants, but because I had leftover landscape fabric stored in our garage, I duct-taped a layer of it at the bottom just to see if it would slow them down. |
 |
| On top of the landscape fabric, a layer of gravel to help disperse drainage toward the holes underneath. |
 |
| Next came the plastic layer. My sincere thanks to Garn Wallace of El Segundo California for educating me about zinc, which is the metal that was used in the tank galvanizing process. Zinc is not particularly toxic to humans or animals (remember, livestock typically drinks directly from these tanks by design), but apparently zinc inhibits woody growth when soil concentrations get too high. I lined the interior of the tanks with 6-mil plastic to shield the soil from contacting the tank and thus reduce any leaching. Lawrence thought that the black plastic would stand up better to the little bit of UV light that is expected to reach it. You can't see it in this photo, but the bottom of the plastic is slashed liberally in a radial pattern to further promote the flow of water through to the underlayers. I threw a bit of extra gravel on top as well. |
 |
| One more thing to do before the soil can be added: remember, we had to clip the irrigation stub in order to easily lift the tank back off so that the space in the center of the cement blocks could be backfilled with gravel. Now that the base is all assembled, I had to splice on the riser. |
(OR, THE DIRT ON DIRT).
And now for the discussion about soil, which has been the most frustrating part of this whole job.
I took a six-hour vegetable gardening course through Texas AgriLIFE Extension Service a few weeks ago (if you want to divert and read more detail about that class, you can access a blog entry here). In that course, the instructors stressed soil, soil, soil the way real estate agents chant location, location, location.
Only trouble was, soil with the composition and virtues that they so passionately extolled basically does not exist in our area.
The sad story goes like this. We cannot grow much of anything except weeds and Yaupon in our native soils because they are very poor "gumbo" clay soils and because they drain so poorly. Therefore, the only way to establish a decent garden is to build it on top of native soils using "created" soils with the proper physical, chemical, and biological characteristics.
I guess I'm a spoiled American because, when I hear about a commodity such as "garden soil", I expect to be able to march right out and purchase it from some convenient retail location which is open seven days a week. If I don't know where a good retailer is located, I naturally expect that simply asking someone who is in-the-know will yield the information I need.
Not so with soil. I think I would have had an easier time determining where and how to buy crack cocaine. The Galveston and Harris County Extension agents were not able to advise me - this much I expected, because their public service role requires them to be impartial. But I also found that the local Master Gardeners seemed equally reluctant to talk. I felt like screaming, "Honestly, I'm not an industry spy gathering market data! I'm just a suburban newbie who is trying to fill some tanks with nice dirt!"
I have a basic rule of thumb for anything having to do with landscaping in greater Houston: if it's not strictly within the scope of Randy Lemon's expertise (he concentrates mostly on ornamental landscaping), and if I can't find the answer anywhere else, I go to Maas Nursery. It will rarely be the most economical route because top quality does not come cheap, but they WILL have an answer to whatever the issue is. And so it was on the issue of stock tank soil: one of their salespeople recommended that I use commercially-available gardening soil from any of the local yards, but that I but amend it with both Cotton Burr Compost and Microlife fertilizer. So I bought 12 cubic feet of the former and 80 pounds of the latter.
After visiting about four local soil yards, I chose Living Earth Technology as the soil vendor. While their "ultra" soil (about $28 per cubic yard) appeared to my un-trained eye to have an undesirably large fraction of wood fragments (decomposition of wood sucks nitrogen from the soil and correspondingly robs the plants of it, as this very useful local blog post describes), at least they DID know the difference between sharp sand and bank sand. Their "ultra" soil was actually reported by the salesperson to contain masonry sand, but at least it isn't bank sand, which was reported by the Extension agent as being too full of native weed seeds to be of much use for vegetable gardening.
If you live on the north side of Houston, reportedly Nature's Way is THE place to go for gardening materials; several of my electronic and human sources alleged that they are the best vendor (and in fact they've won awards to that effect). But we are about 70+ miles from them, which would have made delivery costs prohibitive. I decided to go with the Maas salesperson's recommendation (Maas Nursery actually sells some of Nature's Way's soil, but I believe it was about $100 per cubic yard, which I found to be prohibitive for our size of project, thus the salesperson's alternative suggestion of using 'regular' garden soils with the aforementioned amendments).
(6) THE FILL
I wanted about 3 inches of freeboard available at the top of my tanks, and therefore I filled them to the very top, even after climbing in and gently grape-stomping some (but not all) of the air out of the soils. I expect that gravitational compaction and natural organic breakdown will reduce the volume by at least another 10% in short order.
I concentrated most of the Microlife and Cotton Burr compost in the top 12 inches.
(7) THE PLANTS
When we moved into our house about six months ago, I picked up some generic starter herbs at the local Lowes Hardware, and grew them in pots to get the roots established, with a future eye toward transferring them to these tanks.
In the weeks preceding the completion of the first two stock tanks, I visited the Clear Lake Shores Farmers Market and found a micro-business known as Faith's Garden Shed "Naturally". From the most cheerful proprietor, I bought more herbs and some vegetable starts. She also sold me some wonderful flowering plants that would be appropriate in terms of color, growth size, and sun tolerance when used as central ornamentals.
(8) THE RESULTS
 |
| The four-footer with two varieties of oregano, lemon mint, sage, rosemary, a hacked-off basil that is telling me it wants to come back from the root ball, an Indian curry plant, and an ornamental (mona plectranthus) in the center. |
 |
| Close-up of the mona plectranthus. Way too pretty!! |
 |
| The first six-footer with four broccolis and one Swiss chard. I'm starting off by spacing them widely, just until I see what happens with this thing. The central ornamentals include a cigar plant and the yellow one beside it is a thryallis. |
 |
| Close-up of the cigar plant. I wanted to be able to keep the central ornamentals light and airy. |
 |
| Tanks 1 and 2 in oblique view, ever-curious dog (Catahoula / Australian Shepherd mix) for scale. I hope to fill the back side of this first six-footer with onions and garlic this coming weekend. Bear in mind that these plants are new and it's mid-November right now... I foresee much more luxuriant growth once everything is established and also when spring comes. |
Major expenditures for this project were roughly as follows :
- Three stock tanks - $600
- 5 cubic yards "ultra soil" - $140
- Concrete pavers - $100
- Microlife fertilizer - $80
- Cotton Burr compost - $50
- 1 cubic yard gravel - $65
- Plastic sheeting - $30
- Flower and vegetable plants - less than $100
- Subtotal - $1,165
- Sales taxes - $100
- APPROX TOTAL: $1,265
(a) Labor: you'll notice that we have no labor costs listed above. That's because we did it all ourselves.
DANGER, WILL ROGERS - if you are not physically fit by virtue of a rigorous existing exercise regime, you will hurt or kill yourself if you attempt this type of project without assistance. The materials listed above weigh about ten thousand pounds, and moving them is no small feat. I'm no spring chicken, but I exercise seriously and can swim a 22-minute kilometer without breathing hard. Even at my fitness level, this garden project wore me out! (which was half of my purpose in doing it - exercise is a habit of mine that has got to be fed). At the first snowfall every winter in my native Nova Scotia, I used to turn on the radio because I knew that they'd announce the local death statistics: the people who gave themselves heart attacks by shoveling snow from their driveways without first working up to the level of fitness that the task required. Well, soil and rock are the Houston equivalent of snow.
 |
| Excerpted from: http://www.capebretonpost.com/News/Local/1969-12-31/article-2112454/The-scoop-on-shovelling-snow/1 |
Of course, there's the potential for future aggravation if our plants won't grow after all this effort and expense, but I foresee myself respecting a natural learning curve there. If it turns out that we have problems with the soil even after adding compost and Microlife, I guess we'll just have to keep iterating with additional amendments and fertilizers.
Happy gardening!
;-)
Alison
alison.journey
at
gmail.com
***POSTSCRIPT, MARCH 8, 2011***
I thought I'd provide an update here on the same post because I can tell from the internet traffic that this information is probably being useful to some folks.
We newbies have been delighted by the success and productivity of these gardens!!
 |
| One of the broccoli plants on December 22, 2010, with 12-year-old child for scale. |
 |
| March 8, 2011: The same broccoli plant, now in flower, just two months later, and the same child for scale, still 12 years old but now going on 20 years old despite being just two months older. In other words, the child appears to have matured more rapidly than this broccoli. Is that even physically possible?? Apparently it is, because other parents report similar phenomena occurring with their children. |
 |
| Black bee. |
 |
| Honey bee. |
 |
| One of the crowns from that same plant. It was an AWESOME feed!! |
***POSTSCRIPT, MAY 11, 2011***
Here below is the current state of the organic onion crop. I realize now that we could grow a heck of a lot of food in a six-foot stock tank, if we had to:


By the way, thanks to everyone for making this post one of the highest-ranked stock tank garden information sites on the internet! (Because of the way Google works, you'll see different rankings based on your geographic area and internet traffic patterns). If I've helped people across the world with their own gardening projects, then all the time and energy that went into this post has been well worth it!
:-)

***POSTSCRIPT, MAY 3, 2011***
FYI, in the spirit of urban homesteading, we now have a companion post to this entry for a new gardening project:
"Watergarden from start to finish".
*** POSTSCRIPT, JUNE 5, 2011***
I wanted to provide an update regarding the economics of the stock tanks, because the results have been surprising to me. We did this garden project for the love of it, not to recoup our investment, but the financial aspect is interesting in its own right, so here goes.
So far I calculate that we have saved about $125 in groceries by virtue of the stock tank harvest, here in the first eight months or so of experimentation. When I took the gardening class from the local Ag Extension office, the instructor stressed that home gardening did not have good prospects for becoming effectively cash-flow positive. But that instructor was talking about conventional costs, whereas we buy organic at 2x to 3x the cost of conventional produce. That becomes a different equation.
 |
| Urban homesteading at its finest: Home-grown organic onions, hi-tech ELFA shelving, and a wireless router in the background. |
So we're seeing at least 13% of the original tank-building investment recouped in less than a year - and we didn't even try. This was entirely an experimental year for us. And that figure of 13% recoup does not include the gas and time I saved by NOT having to run to the grocery store numerous times.
In sum, I'm impressed. If a gardener wanted to focus on return-on-investment, I'm convinced that these tanks could be made to pay for themselves within a few years.
 |
| Our very first organic Anaheim. I could have allowed it grow much larger, but its presence was required in a Sunday morning omelette I made for us this morning, along with our own onions, garlic, tomatoes, and jalapenos. |
| Screengrab from the NWS URL above. This might not seem like a big deal to those of you in arid regions, but Houston is subtropical, receiving an average of about 48 inches of rain per year! To not have rain for 80 days is simply unheard of. |
Right now, because of the drought and the absolutely stunning high temperatures that have come with it, we have moved into "temporary-repurpose" mode.

 |
| Bat-faced cuphea doesn't seem to mind the heat. |
As I write this, we are 12 degrees above normal and 5 degrees above the previous record-high temperature. I think I better go pull in some more of our tomatoes.
;-)
 |
| Thumb from Houston Chronicle. |
 |
| Another amusing screengrab from that NWS URL above. |
Fantastic information, Alison, and you are a talented writer. I'm finally beginning to re-landscape our Ike ravaged property as we finish our re-build. I was researching stock tank suppliers when I came across your blog. It's very informative and I particularly appreciate the sourcing info. You're right...it is sometimes like it's a matter of national security to get accurate details. Thanks for sharing your hard work! Linda
ReplyDeleteGreat information, thanks for taking the time to do this!
ReplyDeleteWOW - This is extremely thorough and helpful. I just scored an oval stock tank for $30 from a garage sale (it fit in my mini van so no trailer needed :) ) I'm looking forward to planting tomatoes and basil in it. Thanks for the completeness and photos of your post! We have family in Houston and although I know the original post was written a few years ago, Texas has temperatures I could never tolerate. I've heard that Austin is a wonderful town. Hope I get to visit sometime.
ReplyDeleteShade cloth....50-70&% is what I use in the Texas summer. I place pieces cut for the size of the stock tank. You can get remnants for very cheap at Grower Supply.com. I clip them using bamboo clothes pins to metal arches that I make from metal "ladders" that are used in between layers of concrete block. You can get these at any lumber yard or hardware store that sells lumber. They come in 20 foot lengths and I cut them for the size I need. You can also attach the shade cloth to lengths of pvc arched over your stock tank like one of those "bubble tents" in a cross pattern. I drive pieces of rebar into the bin leaving about 6 - 10 inches above the dirt. I place the pvc (1/2") over the rebar so it holds it in place. the pvc comes with bell ends to put these together easily. But you might have to buy some couplers. no need for the glue.
ReplyDeleteThanks for all the great details on stock tank gardening. I'm looking into buying some smaller stock tanks but am cconcerned that I won't be able to get the manufacturers stamp off the side of the tank. We will be able to view ours from all sides so I just want to see galvanised metal not a logo! Do you have any advice? Thanks in advance. Katriona
ReplyDeleteI'm going to recap our complete stock tank vegetable and flower garden ... galvanizedtrough.blogspot.com
ReplyDeleteAfter a lengthy internet search, I settled on Behlen Country galvanized round stock tanks. They appeared well-made to me, and they add a ... metaltrough.blogspot.com
ReplyDeleteenjoyed the honest advice
ReplyDeleteenjoyed the honest advice
ReplyDeleteGreat advice -- and wonderful writing. By the time I found your post, I had decided on Behlen Country round stock tanks for the same esoteric reasons -- too funny. : )
ReplyDeleteI'd been struggling with the to-drain or not-to-drain thoughts as well. Your post has cinched it for me -- and yes, it seems unthinkable to drill holes in a perfectly shiny new tank. We're a lot dryer in Colorado than most places -- but we still get those downpours...
This post is awesome. Thank you so much for the step-by-step details. Stock tanks are the plan for next years garden.
ReplyDeleteThis comment has been removed by the author.
ReplyDeleteGreat detail and excellent writing. Thanks for sharing!
ReplyDeleteThanks so much for writing this article. I started thinking about using stock tanks last year, but didn't have time to do it. My 4x8 wood frames are disintegrating so time to buy something new! And I like that they will last much longer than wood. Still not too sure about the heat situation since they are metal. I don't want my plants to burn nor do I want to get burned if I accidentally touch it (or my kids).
ReplyDeleteI refer to my time spent browsing the inter web as "researching." Generally that's just a nice way for me to validate myself...however, the time I've spent this morning researching on your blog really has been time well spent. Thank you for the narrative that was both enlightening and entertaining. Well done!
ReplyDeleteCurious about the PVC piping. Were you going to feed drip line through it to be able to water?
ReplyDeleteDid the metal tanks get too hot in the summer and burn the plants?
ReplyDelete