I started CAYLWAWRAL almost three years ago to document, well, a whole hell of a lot of stuff, actually. Way too much diversity for one blog.
In the intervening time, and because of that complexity, I began to split off a lot of my publicly-oriented content into twin topical blogs that have since grown to be held in modest esteem within our community and geographic area.
This morning I completed the other side of that transition by creating a new family blog that will be unlisted and accessible by invitation only. That's intended to replace and improve upon the personal side of CAYLAWRAL.
I have reached my limit on this idea of blog-as-faceplate. I have never been comfortable with the personal branding, air-brushing and showmanship that have infected the blogosphere, which is precisely why I always tried to include as much general value-added content as possible in CAYLAWRAL, even though it didn't fit stylistically with the personal and family material.
In order to be existentially valid, a blog has to serve somebody with a purpose more profound than simple ego puffery. And in order to really serve, it has to be honest and an accurate representation of reality. My two topical blogs are less personal in nature and therefore it's appropriate to keep them public, but the honest and accurate nitty-gritty family stuff is intrinsically private and needs to be kept that way.
The new blog is intended primarily to serve the CAY in CAYLAWRAL, the CAY who is now a teenager facing an order of magnitude more life responsibility as a pending adult. Those of you family and close friends who are reading this will get an invitation with a sign-up URL shortly.
I extend a warm thank you to all of you, the tens of thousands (!) of you, who have accessed sections of CAYLAWRAL. I hope I've been able to bring you some good ideas or a tiny bit of inspiration along the way. I will leave CAYLAWRAL posted up for the time being, because I can see statistically how that content is still being sought.
Thank you, and good luck to you all in your respective lives.
Thursday, December 13, 2012
Wednesday, March 14, 2012

Thursday, March 8, 2012
Cinder block garden from start to finish
Content migrated to another family member's blog - see this post.
Content migrated to another family member's blog - see this post.
Monday, February 27, 2012
Teen workstation IKEA hack from start to finish
If you've stumbled upon this entry via a route other than the main IKEA Hackers website, let me briefly explain that "IKEA hack" is a term used to describe modifications to, or repurposing of, IKEA household products to yield something new and customized to the user's needs. IKEA is famous for offering furniture which is fashionable, affordable, and extremely versatile. These factors combine to make it ripe for adaptation to new uses.
In our case, we're celebrating our daughter's transition from middle school to high school this coming fall. This necessitated replacement of her original young-child furniture with something more responsive to her needs as a budding young adult. Not only was the furniture clearly too small for this stage of her life, the lack of storage had morphed her work area into an absolute mess:
In designing this part of her bedroom, we searched high and low for ideas, and were inspired in large part by a wonderful home-office hack from 2008:
We spec'd out a general design before going to IKEA Houston, but here's an important bit of advice: DON'T marry yourself to a set configuration before you actually see the components in the room. What looks good on paper might not be ideal in 3-D, as the following sequence of photos illustrates.


Summary of components from IKEA:
We close this post by re-iterating that, if you undertake IKEA hacks such as the one shown here, you have to be absolutely sure that your final product is more than safe. Note how much emphasis we placed on securing all the components we installed. We lag-bolted them into multiple two-by-four wall studs to ensure that they would never fall. Someone sitting beneath a fully-loaded elevated Expedit unit could be injured or killed if the mounting hardware were to fail. Consult a professional if you are unsure of your DIY skills.
If you'd like to see any of our previous "start to finish" home improvement blog entries, here they are:
Stock tank gardens from start to finish
Water garden from start to finish
Ollas from start to finish
Garden mirrors from start to finish
In our case, we're celebrating our daughter's transition from middle school to high school this coming fall. This necessitated replacement of her original young-child furniture with something more responsive to her needs as a budding young adult. Not only was the furniture clearly too small for this stage of her life, the lack of storage had morphed her work area into an absolute mess:
 |
| It was a cluttered mess!!!! |
 |
| Jennifer and Sean, you guys RULE!! :-) This space, however, was more traditional and more adult than we wanted our daughter's to be. We also needed a longer counter span so that more than one chair could fit side by side (for helping with homework and also for the multiple girlfriends clustering around the computer for Facebook- and Youtube-watching purposes). Additionally, IKEA has apparently stopped making the Mikael drawer units visible in the lower right corner of Jennifer and Sean's photo, so that necessitated our substitution to be shown below. |
 |
| Here's the whole shebang in all its flat-pack glory, freshly unloaded from the family minivan. |
 |
| We assembled the components in our garage so we could look at them, but did not attach them here (the table leg is simply balanced under the countertop in photo right, not screwed in). Dogs, by the way, really dislike remodeling. Too much commotion for their canine sensibilities. |
 |
| This is what I had originally drawn on paper as my preferred configuration, but once we "dry fit" it into the room, I began not liking it so much. It felt too disjointed and the Lack shelf unit seemed lost in that dark corner. OH - another vital piece of advice: never purchase any large objects for your home without first cutting them out of cardboard and placing the cardboard mock-ups in the intended spaces, to see what they look like. This goes for furniture, cabinetry, large-screen TVs, etc. You simply can't judge the impact in the space until you see a sized representation. Here, we cut the two Expedit bookcases out of cardboard and tacked them to the wall to get a feel for how they will look and balance visually. Jennifer and Sean used two same-sized Expedits in their design, and set one of them right on top of their countertop, but we did not wish to forfeit the counter space by doing it that way. Furthermore, we thought two same-size larger Expedits would be a bit too matchy-matchy for this room. We wanted a lighter, airy effect and two different sized Expedits seemed to work well for that. |
 |
| So here's an alternate lay-out and we began to like this one better, although it was too heavily-weighted toward the far corner of the room. |
 |
| OK, at this point, it started looking better to us, and this is the general configuration we settled upon. Moving the whole unit to the right and placing the existing colorful floor lamp in the corner lit up that dark space. Having the Lack shelf unit closer to the window allowed more light through, and also the Lack shelves mimicked the two-inch white blind on the window and balanced out the asymmetrical curtain, as you'll see in the final "AFTER" photo. Note that, even in this dry-fit stage, we still made sure to fit the television and cork board into the arrangement, to verify whether or not they'd appear visually balanced. Fit twice, measure three times, and install once. |
 |
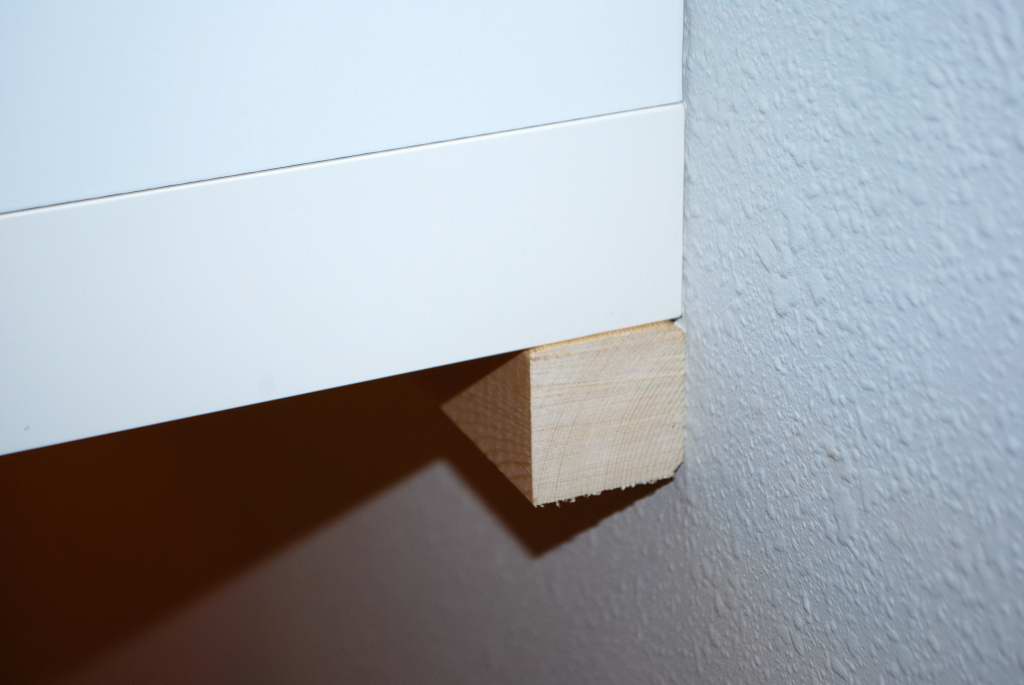
| The pieces start to come together. Note carefully that under each Expedit and the 96-inch Numerar countertop, there is a 2" x 2" piece of pine strapping lag-bolted to the wall studs. |
 |
| Close-up of the ledge that this created. Very important that each lag bolt penetrate the stud behind the sheetrock. Having a wooden ledge under the countertop is also useful because you can install hooks in it and use them for hanging storage. |
 |
| We attached the back of the counter to the wood ledge with small angle-irons. Our overall configuration actually results in a very long span of countertop which is unsupported on its front. I'm hoping this back support will prevent it from sagging over the long term. If it does prove to sag, we'll install a skinny CD tower or something halfway down its front length in order to support it. |
 |
| Here you can see the side of the smaller Expedit as it sits on top of its 2" x 2" ledge. |
| Very little in construction turns out to be perfectly flat. In one place, we had to shim the larger Expedit using metal washers. Each 2" x 2" wood ledge was then painted white to match the wall, and this gap under the larger Expedit was completely hidden by the electrical cord conduit for the LED puck lights. |
 |
| As well as installing ledges to bear the weight of the Expedits, we added angle-iron straps which are also lag-bolted into the wall studs. IKEA supplies the brackets visible in the corners above, but given the sheer amount of weight that this unit is going to hold, we decided it needed reinforcements. It is now connected to three separate wall studs using a total of ten lag bolts (it is, afterall, a child's safety that we need to consider here). In the event that we experience a Category 5 hurricane, this wall might get blown down, but I seriously doubt that this Expedit would ever separate from it (we live on the upper Texas coast where hurricanes are routine). |
| The reinforcements and brackets were painted to match the wall they are attached to, making them much less visible. That plus the fact that there will be books and boxes in front of them makes them basically invisible in the finished product. |
 |
| The base unit was a 3-drawer kitchen cabinet measuring about 15" wide by about 30.5" tall. Because we wanted this assemblage to be closer to desk-height instead of counter height, we had to buy one-inch "feet" from a big box hardware store and use them instead of the taller legs it was supposed to come with. It has to have SOME kind of feet under it, or else the bottom drawer will scrape against the floor when opened. This pic was taken as this foot was being hammered into this bottom corner. It's basically a little foot attached to a nail, and is hammered in up to the level of that first ring visible by the fingertips. I don't have my receipt in front of me as I type this, but this was an Akurum cabinet or current equivalent. However when I try to hit the IKEA website to verify this, it gives me "page not found" for Akurum cabinets. The drawer fronts were simply the least expensive plain-white option that IKEA sells for these things. The white shade is close enough to the Expedit that you can't tell the difference. |
 |
| We also installed a corner shelf under the countertop to hold electrical cords and transformers. This is a little shelf we happened to have hanging around un-used. It probably came from Container Store at some point in our past. |
 |
| Nice to have this mess well-hidden under the countertop. |
 |
| We also installed a grommet in the top of the counter for the cords to feed down through. Check out the selection that your big-box hardware store carries, and buy one of those drill coring bits to match the size. Above you can see the black cord from the laptop computer and the two power cords for the IKEA LED lights, as follows: |
 |
| (1) We installed a set of four directional LED puck-lights under the Expedits: three under the large one, and one under the lower small one (brand list at end of post). |
 |
| If you include LED lights, you will face the inevitable headache with the cords. We used wire conduit from the local hardware store and placed the cord components in inconspicuous areas (this piece is scooted right next to the cork board). It does not look unsightly. And it's a teen's room, afterall - no need to be perfect or formal. |


 |
| (2) Every teen room must have a little bit of bling, and how can you not LOVE the color-changing LED light strips that IKEA sells?! This is everyone's favorite part of the final design. Pricey but worth it. We mounted one strip on the top of the larger Expedit for an up-lighting effect. |
 |
| OK, you have to take one more look at the cluttered "BEFORE".... |
 |
| And yippee!!! The "AFTER"!!! :-) Point of clarification: that black screen to the far right of the countertop is the TV sitting on its satellite box, not the computer. Some readers confused that with a computer and wondered why it was pushed so far to the right, but she's actually typing on a laptop computer in front of her. Her bed is on the wall opposite this installation, and so having the TV in that position allows easy viewing from the bed. Also, her chair does raise up higher than shown here, but she prefers to sit lower down like this with her face in front of the laptop screen. Because it's underpinned by the kitchen cabinet visible at photo left, the counter is a little higher than a desk (as I mentioned above), but it's not so much as to cause a height-related problem. See how the Lack shelf unit balances out the one curtain on this window? The window butts right into the corner of the room, so there is no space for another curtain to the left of it. But the Lack now gives it more relational symmetry. |
- Expedit large bookcase in original white (not the newer glossy white because remember, you have to match the lower kitchen cabinet to it) (1)
- Expedit small bookcase (ditto) (1)
- Expedit door inserts (4)
- Lack shelf unit in white (1)
- Numerar countertop, 96", grey side up (1)
- Akurum 15" cabinet or equivalent (1) (get help from the IKEA kitchen staff in selecting it; no link available at the time of this post)
- Galant T-leg (1)
- IMPORTANT: There's a special heavy-duty bracket that mates the Galant leg to the underside of the counter, but I cannot find a URL for it on IKEA's website. Check the same self-serve aisle that contains the legs and you'll likely find it.
- Dioder color light strip (1)
- Inreda spotlight pack (1)
- Kasset boxes in green and orange (2 packs)
- Tyda handles (two 2 packs, for the kitchen cabinet, which is a three-drawer unit, so you'll have one handle left over)
- 2" x 2" x 8' pine strapping (2, with the one under the Expedits cut to two sized pieces)
- 4" lag bolts (for the wooden ledges; about 12)
- 3" lag bolts (for the metal strapping; about 10)
- Angle irons (about 10 in two sizes - smaller to attach the countertop to its wooden ledge, and larger to anchor the Expedits to the wall studs)
- Hole-coring drill bit
- Desk grommet in grey plastic
- One-inch cabinet "feet" (6) (look in the section that also has the felt feet for chairs)
- Miscellaneous minor hardware including various screws and drywall anchors
- Wiremold low-voltage cord concealer components
- Cordless drill (most essential tool)
- Drill bits in various sizes, including grommet-coring bit and screw driver bits
- Hammer
- Socket wrench and/or drill adapter bit for the lag bolts
- Manual screw drivers
- Miter saw or fine-toothed hand saw (to cut the 2" x 2" wooden ledges).
- Pliers
- Measuring tape
- Staple gun (for light cords)
- Probably a few other miscellaneous hand tools, but nothing fancy
- Two physically-capable (strong!) adult DIYers at a minimum, medium skill level.
We close this post by re-iterating that, if you undertake IKEA hacks such as the one shown here, you have to be absolutely sure that your final product is more than safe. Note how much emphasis we placed on securing all the components we installed. We lag-bolted them into multiple two-by-four wall studs to ensure that they would never fall. Someone sitting beneath a fully-loaded elevated Expedit unit could be injured or killed if the mounting hardware were to fail. Consult a professional if you are unsure of your DIY skills.
If you'd like to see any of our previous "start to finish" home improvement blog entries, here they are:
Stock tank gardens from start to finish
Water garden from start to finish
Ollas from start to finish
Garden mirrors from start to finish
Saturday, January 21, 2012
Garden mirrors from start to finish
Following up on our "start to finish" series that includes stock tank gardens from start to finish, watergarden from start to finish, rainwater harvesting from start to finish, and ollas from start to finish, we now have garden mirrors from start to finish.
Right off the bat, I must warn you: this was a tougher project than the others we tackled. You've heard the expression "go big or go home"? Well, I wanted to go big, and what I didn't count on at the outset was the amount of work it would take.
(2) SOURCING.
Mirrors. I would not have attempted this project except for one stroke of good fortune: I found a used pair of enormous sheet mirrors at a church yard sale and bought them both for $40.00. If the same pair of mirrors had been purchased new at retail prices, they would have cost around $600.00, which would have made this project out of the question by virtue of unreasonable expense. If you are considering a similar project for yourself, keep this in mind: wall-sized sheet mirrors are becoming less popular as designer trends dictate fancier framed mirrors in residential bathrooms. For this reason, many suburbanites are de-installing their large builder-grade sheet mirrors when they remodel. If you can locate one or more of those secondhand, you might get them at giveaway prices.
(3) CONSTRUCTION.
Now, this is the section where, if this were any other "start to finish" blog post from us, I would go through the construction in painstaking step-by-step detail. In this case, however, I'm going to summarize general procedures, ideas, and limitations for you to keep in mind if you do your own project. There are many different ways to put mirrors into a landscape, every landscape is different, and this is only one approach represented below.
Mirror frame must be both flat and rigid. This was by far the biggest challenge we faced in designing this project. I managed to drag two enormous but cheap mirrors home from a yard sale, but at that point, we almost became stymied by the obvious technical challenge: how the heck were we going to mount these things in an outdoor environment in a way that both supported their considerable weight, would stand up to the wind (in our area, sometimes hurricane-force), AND would keep them from flexing, which would have led to breakage?! And how were we going to keep that frame from deteriorating when exposed to considerable fluctuations in temperature and humidity? And accomplish all of these goals at reasonable cost? Yikes!!!
After great debate,we settled upon pressure-treated plywood as the backing.
The only trouble with this plywood was that it was very green and it had a very high moisture content. In order to get it as flat as possible and as stable as possible, I had to lay it out to dry on the garage floor in a process that took approximately three weeks!!!!!
Once the plywood was as dry as I figured it was ever going to get, we cut each piece down to size, making them about 6 inches larger than each mirror.
These cut-down pieces then received multiple coats of the outdoor oil-based paint.
Then it was time to construct the frames to hold the backing. This is where my husband's engineering skills came in handy. Basically we had to cut the frame posts so that they could notch into one another in the same plane...

.. but we also had to cut a groove around the entire frame perimeter into which the plywood could then be inserted so that it would not warp in the future (and crack the mirrors in the process). We considered stabilizing the plywood using other rigid means such as galvanized metal brackets, but that seemed too complicated. The channel-inset solution was my ever-brilliant husband's idea.
Now for a bit of close-up finish detail:
And now for the semi-finished product, and I do mean "semi" because as I write this, it's the month of January, which means we are in dormancy as far as most plants are concerned:
Since the initial installation was completed, we've seen some softening with additional vegetation growing, and I have also discovered an unexpected bonus:
I realize that, stylistically these things would not be to everyone's taste. Aside from wanting garden mirrors, the unusual design we chose reflected a bit of nostalgia on my part: the frames remind me of the Parks Canada signs which have been a part of fond memories throughout my entire life:
So there you have it, and I will post additional pictures as these installations begin to approach their full aesthetic potential.
Right off the bat, I must warn you: this was a tougher project than the others we tackled. You've heard the expression "go big or go home"? Well, I wanted to go big, and what I didn't count on at the outset was the amount of work it would take.
(1) BACKGROUND.
Let me first explain what garden mirrors even are and why they are used. Garden mirrors have not yet gotten very popular in America for a couple of reasons:
- Most "new world" folks already have what outdoor mirrors are intended to provide an illusion of: SPACE. Mirrors tend to be more popular in Europe where, even if folks are wealthy, they often do not have much land around their homesteads. Therefore, the clever use of mirrors can add extra dimensions to small backyards (which they tend to call "gardens").
- It takes a relatively large mirror to do justice to even a small backyard space, and large mirrors are both expensive and difficult to install.
 |
| While these definitely add to the landscape, I find them a little underwhelming because of their relatively small size. From MoZone The Blog. http://www.moplants.com/blog/?p=1047 |
 |
| Now I'm beginning to get enchanted. From http://momspirational.blogspot.com/2011/05/garden-mirrors.html, although that source may have obtained the photo elsewhere (they posted what appears to be one of MoZone's without attribution). |
 |
| Even more enchanting. From http://www.sunset.com/garden/landscaping-design/mirror-magic-00400000016634/ |
Mirrors. I would not have attempted this project except for one stroke of good fortune: I found a used pair of enormous sheet mirrors at a church yard sale and bought them both for $40.00. If the same pair of mirrors had been purchased new at retail prices, they would have cost around $600.00, which would have made this project out of the question by virtue of unreasonable expense. If you are considering a similar project for yourself, keep this in mind: wall-sized sheet mirrors are becoming less popular as designer trends dictate fancier framed mirrors in residential bathrooms. For this reason, many suburbanites are de-installing their large builder-grade sheet mirrors when they remodel. If you can locate one or more of those secondhand, you might get them at giveaway prices.
Framing materials. All of the framing materials came from a big box hardware store and are pretty simple (general inventory for two separate mirrors):
- 4x4 inch pressure-treated posts (four 10-footers and four 6-footers)
- three-quarter inch pressure-treated plywood (two 4 x 8 sheets)
- exterior oil based paint (1 gallon)
- common hardware (bolts)
- aluminum mirror mounting track (4 pieces)
- ready mix concrete for mounting the finished framed mirrors in the ground (about five 50-pound bags).
- A circular saw with a good sharp blade suitable for cutting plywood and pressure-treated lumber. (If you have more sophisticated equipment such as a table saw, your life would likely be easier with this project, but all we had on hand was a circular saw).
- Measuring tape.
- Something to use to support lumber and the project as it is being constructed (we used about a half dozen cinderblocks)
- A wood rasp or file
- Post hole digger
- Bottle jack
- A great deal of construction-related brain power
(3) CONSTRUCTION.
Now, this is the section where, if this were any other "start to finish" blog post from us, I would go through the construction in painstaking step-by-step detail. In this case, however, I'm going to summarize general procedures, ideas, and limitations for you to keep in mind if you do your own project. There are many different ways to put mirrors into a landscape, every landscape is different, and this is only one approach represented below.
Mirror frame must be both flat and rigid. This was by far the biggest challenge we faced in designing this project. I managed to drag two enormous but cheap mirrors home from a yard sale, but at that point, we almost became stymied by the obvious technical challenge: how the heck were we going to mount these things in an outdoor environment in a way that both supported their considerable weight, would stand up to the wind (in our area, sometimes hurricane-force), AND would keep them from flexing, which would have led to breakage?! And how were we going to keep that frame from deteriorating when exposed to considerable fluctuations in temperature and humidity? And accomplish all of these goals at reasonable cost? Yikes!!!
After great debate,we settled upon pressure-treated plywood as the backing.
 |
| A minivan is a wonderful thing. It can swallow 4 x 8 sheets of plywood without even belching. I have an entire series of photographs depicting all of the remarkable things that my van has hauled over the years. |
 |
| Every time one side would begin to get a little bit dry, it would warp. I would then flip it over to re-flatten it, and let the other side dry. As I was doing this, I weighed down the curling edges using cinderblocks and my husband's set of free weights. This whole process was a pain in the lower anatomy, to be sure. |
These cut-down pieces then received multiple coats of the outdoor oil-based paint.
Then it was time to construct the frames to hold the backing. This is where my husband's engineering skills came in handy. Basically we had to cut the frame posts so that they could notch into one another in the same plane...

.. but we also had to cut a groove around the entire frame perimeter into which the plywood could then be inserted so that it would not warp in the future (and crack the mirrors in the process). We considered stabilizing the plywood using other rigid means such as galvanized metal brackets, but that seemed too complicated. The channel-inset solution was my ever-brilliant husband's idea.
 |
This pic shows The Engineer working on the top piece of the frame. The plywood has alread been fitted into the inset channel in the frame piece to photo right. The come-along straps were used to ensure that the plywood was all the way into the channels, and also to hold the frame tight while it was being bolted together. |
 |
| As I mentioned at the beginning of this blog post, this was not an easy task, and it wasn't the safest project we ever did either. If you do anything like this, proceed carefully after giving each stage in your process some good contemplation. This is not a fast project, either. We worked on it on and off for a couple of weeks (for two mirrors). |
 |
| Once we got the frame bolted together and lowered into the holes we dug, we had to somehow hold it in place while the concrete was poured into the holes around the legs and allowed to harden. We used a floor jack and some cinderblocks to accomplish that. We also framed up the concrete "feet" using loose bricks, which we later came to regret because it was difficult to remove the bricks from the hardened concrete. On our second garden mirror, we used thin plastic forms instead of bricks because they were easier to remove afterward. |
 |
| Here's a close-up of the joinery in the lower right-hand corner of the mirror. It takes considerable construction skill to get these joints to match up perfectly. |
 |
| We used aluminum mirror mounting track to hold the mirror sheet onto the plywood backing on both its top and its bottom. We sealed the top with clear silicone. You have to remember that this kind of sheet mirror is not designed to frequently get wet. Most of the Internet resources I found (what few there were) recommended sealing glass mirrors to some kind of a waterproof backing if they are going to be placed outdoors. Otherwise, the mirroring might delaminate (peel off). |
 |
| We also silicone'd down each side... |
 |
| ...but we left the bottom without silicone. We figured there was no way to get a perfect seal all the way around the mirror - it was bound to leak a bit somewhere. Therefore, we left the bottom open so that if any water did get between the mirror and its plywood backing, it would have a place to drain out. Time will tell whether this approach is sufficient to prevent significant deterioration of the mirror. |
 |
| View of the larger of the two mirrors shortly after installation. Ultimately, I want to run vines up the fence and across the mirror frame so that it gets partially covered and therefore looks a little less stark. In this rather barren configuration, the combination of mirror plus stock tank is faintly reminiscent of a commode (it actually looks LESS like a commode when viewed in 3-D because, between the mirror and the tank, there's a gap large enough to walk through). |
 |
| Tank as of today. That's broccoli in the rear, and onions in the front. The mirror actually reflects additional sunlight to the plants in the tank, resulting in more robust growth than I usually see. |
 |
| Smaller mirror with smaller stock tank (this one contains mostly herbs plus one orphaned broccoli at the moment). Again, in order to complete the picture, additional softening from vegetation is needed. In this case, it will be a southern wax myrtle that sort of cascades over the top of the mirror to soften the edges. That is partially visible to photo left, but still has some growing to do. |
 |
| Cayley and her grandfather in Nova Scotia, summer 2011. |
Sunday, January 8, 2012
First cauliflower: In honor of a cousin
Did you know that many cauliflower variants are naturally purple, and that growers blanche them (keep the heads white) by tying the leaves over the top so that no sunlight can reach down to activate the antioxidant that prompts the color to emerge?
Here's something weird: this is an organic F1 hybrid, which also goes by the name of "grafitti cauliflower", presumably because it's the color of some acid-inspired spray paint. But when I went to Google "F1 cauliflower", this is the first image I retrieved:
Anyway, here's my recommendation for cooking home-grown cauli, at least, in those instances where it is not turned into aloo gobi:
 |
| Harvested today this BIG sucker from our quasi-world-famous stock tank gardens. I always do a comemmorative blog post every time a new vegetable species is sacrificed for the table. BTW, purple-plus-green is my favorite color combination. This is pretty obvious from the way I've structured this blog. |
 |
| Underside. This doesn't even look like something humans should eat. It looks like brain coral or something. |
 |
| From http://www.rkseeds.com/f1_hybrid_cauliflower. Few people realize just how rare that name is in our culture, yet how much it means to Cayley's family personally. |
 |
| Toss chopped florets with virgin olive oil, minced garlic, and the finest-quality Reggiano cheese in proportions to your taste. Bake about 30 minutes. It's simple but fantastic!!!!! |
Cinder block garden design
For some time now, I have been enamored with cinder block gardens, which because of the small soil pocket sizes they present, are generally are used for cacti and succulent collections, as demonstrated by the following:
Despite the fact that these things are one of the hottest DIY garden trends right now, you can tell by looking at the current examples that many are failing to achieve their creative potential. Moscato took the extra step and made her garden turn the fence corner (good call), but it feels like it lacks a bit of cohesion. Penick's is my favorite, is absolutely appropriate for her restricted space, and is unique in being double-sided, but it's still not satisfyingly substantial relative to the balance of her garden creations (and as far as I'm concerned, she's one of the most accomplished landscape designers anywhere).
For this reason, I decided to make my own cinder block garden into a major planning event, measure-twice-cut-once style. Clearly, from the examples in DIY-ville as of today, more of the effort needs to go into the planning rather than the execution stage for this kind of project.
In my case, I have a wasted yard corner tucked behind one of my larger stock tank gardens.
Right now, the area contains nothing but dead grass and miscellaneous junk plus a metal storage rack that's holding up all the starts I bought for the cinder block garden that is to be:
Much of the whizz-bang-zowie we see in architecture these days revolves around 3-D computer representations. But guess what?? Cinder block gardens don't require that kind of high-dollar design investment, because we have a wonderful and cheap construction analog already in our houses: LEGO!!!!
Seriously - what's more fun here - the fact that I will eventually have exactly the cinder block garden that I want and that my available space is calling for, or the fact that I get to play with LEGO while designing it?!
:-)
Anyway, I'm not yet sure that this will be the design I finalize - the great thing with LEGO is that any number of possibilities can be fully investigated in a scale model, and I'm not done tinkering yet. And the other great thing is that, once I finalize it, the business of buying the blocks will be simple: just count the LEGOs I consumed in making the model. And the business of assembling the blocks will be similarly simple: just follow the 3-D map.
 |
| From: http://pocketgrow.com/blog/hydroponic-how-tos/diy-cinder-block-focal-point-vertical-planter/ |
 |
| From: http://www.apartmenttherapy.com/la/gardening/modern-diy-outdoor-planter-093540 |
 |
| From: http://moscatomom.com/diy-cinder-block-garden-phase-one-and-why-i-wish-i-had-paid-attention-in-geometry/ |
 |
| From: http://www.penick.net/digging/ |
For this reason, I decided to make my own cinder block garden into a major planning event, measure-twice-cut-once style. Clearly, from the examples in DIY-ville as of today, more of the effort needs to go into the planning rather than the execution stage for this kind of project.
In my case, I have a wasted yard corner tucked behind one of my larger stock tank gardens.
 |
| It looks like dung right now because of the January seasonal die-back and also because I haven't tamed the current crop of stock tank vegetables, which have obviously all but exhausted the available nitrogen in their soils. And yes, I let that broccoli to the left bolt on purpose. The bees love it. |
 |
| Please find us a nice permanent home really, really soon... |
Seriously - what's more fun here - the fact that I will eventually have exactly the cinder block garden that I want and that my available space is calling for, or the fact that I get to play with LEGO while designing it?!
:-)
 |
| Oblique view of one of my trial models. This model is to relative scale in all three dimensions: each 8" x 16" cinder block is represented by a 2x4 lego brick. The big blue thing in the foreground represents my existing stock tank garden, or "tub garden" as some country folks prefer to call it. The brown thing at photo right is the existing mulch bed with Italian cypress in it (we chose tall skinny trees so that they would not shade the stock tank gardens). |
 |
| Close-up of the central portion. Along with having all the individual succulent pockets in the cinder blocks, I also want to have at least one larger cinder-block planter at the center, to anchor the assembly. That's what I have found to be missing in most of the DIY examples on the internet - a focal point to the focal point, something to give it more substance in the third dimension. |
 |
| Aerial view of the same design. Very important that I get this design right the first time because I have so little space to work with. |
 |
| General impression of how it would look in situ. I'm spatially off kilter just a bit with this photo. You can see my model cypress tree lining up with the actual tree in photo right, but the cinder blocks will not come so far as to impinge on the raised bed to the left. If I had rotated my position a bit to the right, it would look more accurate, but I was just trying to get a general rough feeling by taking this photo. |
Subscribe to:
Posts (Atom)