If you've stumbled upon this entry via a route other than the main IKEA Hackers website, let me briefly explain that "IKEA hack" is a term used to describe modifications to, or repurposing of, IKEA household products to yield something new and customized to the user's needs. IKEA is famous for offering furniture which is fashionable, affordable, and extremely versatile. These factors combine to make it ripe for adaptation to new uses.
In our case, we're celebrating our daughter's transition from middle school to high school this coming fall. This necessitated replacement of her original young-child furniture with something more responsive to her needs as a budding young adult. Not only was the furniture clearly too small for this stage of her life, the lack of storage had morphed her work area into an absolute mess:
In designing this part of her bedroom, we searched high and low for ideas, and were inspired in large part by a wonderful home-office hack from 2008:
We spec'd out a general design before going to IKEA Houston, but here's an important bit of advice: DON'T marry yourself to a set configuration before you actually see the components in the room. What looks good on paper might not be ideal in 3-D, as the following sequence of photos illustrates.


Summary of components from IKEA:
We close this post by re-iterating that, if you undertake IKEA hacks such as the one shown here, you have to be absolutely sure that your final product is more than safe. Note how much emphasis we placed on securing all the components we installed. We lag-bolted them into multiple two-by-four wall studs to ensure that they would never fall. Someone sitting beneath a fully-loaded elevated Expedit unit could be injured or killed if the mounting hardware were to fail. Consult a professional if you are unsure of your DIY skills.
If you'd like to see any of our previous "start to finish" home improvement blog entries, here they are:
Stock tank gardens from start to finish
Water garden from start to finish
Ollas from start to finish
Garden mirrors from start to finish
In our case, we're celebrating our daughter's transition from middle school to high school this coming fall. This necessitated replacement of her original young-child furniture with something more responsive to her needs as a budding young adult. Not only was the furniture clearly too small for this stage of her life, the lack of storage had morphed her work area into an absolute mess:
 |
| It was a cluttered mess!!!! |
 |
| Jennifer and Sean, you guys RULE!! :-) This space, however, was more traditional and more adult than we wanted our daughter's to be. We also needed a longer counter span so that more than one chair could fit side by side (for helping with homework and also for the multiple girlfriends clustering around the computer for Facebook- and Youtube-watching purposes). Additionally, IKEA has apparently stopped making the Mikael drawer units visible in the lower right corner of Jennifer and Sean's photo, so that necessitated our substitution to be shown below. |
 |
| Here's the whole shebang in all its flat-pack glory, freshly unloaded from the family minivan. |
 |
| We assembled the components in our garage so we could look at them, but did not attach them here (the table leg is simply balanced under the countertop in photo right, not screwed in). Dogs, by the way, really dislike remodeling. Too much commotion for their canine sensibilities. |
 |
| This is what I had originally drawn on paper as my preferred configuration, but once we "dry fit" it into the room, I began not liking it so much. It felt too disjointed and the Lack shelf unit seemed lost in that dark corner. OH - another vital piece of advice: never purchase any large objects for your home without first cutting them out of cardboard and placing the cardboard mock-ups in the intended spaces, to see what they look like. This goes for furniture, cabinetry, large-screen TVs, etc. You simply can't judge the impact in the space until you see a sized representation. Here, we cut the two Expedit bookcases out of cardboard and tacked them to the wall to get a feel for how they will look and balance visually. Jennifer and Sean used two same-sized Expedits in their design, and set one of them right on top of their countertop, but we did not wish to forfeit the counter space by doing it that way. Furthermore, we thought two same-size larger Expedits would be a bit too matchy-matchy for this room. We wanted a lighter, airy effect and two different sized Expedits seemed to work well for that. |
 |
| So here's an alternate lay-out and we began to like this one better, although it was too heavily-weighted toward the far corner of the room. |
 |
| OK, at this point, it started looking better to us, and this is the general configuration we settled upon. Moving the whole unit to the right and placing the existing colorful floor lamp in the corner lit up that dark space. Having the Lack shelf unit closer to the window allowed more light through, and also the Lack shelves mimicked the two-inch white blind on the window and balanced out the asymmetrical curtain, as you'll see in the final "AFTER" photo. Note that, even in this dry-fit stage, we still made sure to fit the television and cork board into the arrangement, to verify whether or not they'd appear visually balanced. Fit twice, measure three times, and install once. |
 |
| The pieces start to come together. Note carefully that under each Expedit and the 96-inch Numerar countertop, there is a 2" x 2" piece of pine strapping lag-bolted to the wall studs. |
 |
| Close-up of the ledge that this created. Very important that each lag bolt penetrate the stud behind the sheetrock. Having a wooden ledge under the countertop is also useful because you can install hooks in it and use them for hanging storage. |
 |
| We attached the back of the counter to the wood ledge with small angle-irons. Our overall configuration actually results in a very long span of countertop which is unsupported on its front. I'm hoping this back support will prevent it from sagging over the long term. If it does prove to sag, we'll install a skinny CD tower or something halfway down its front length in order to support it. |
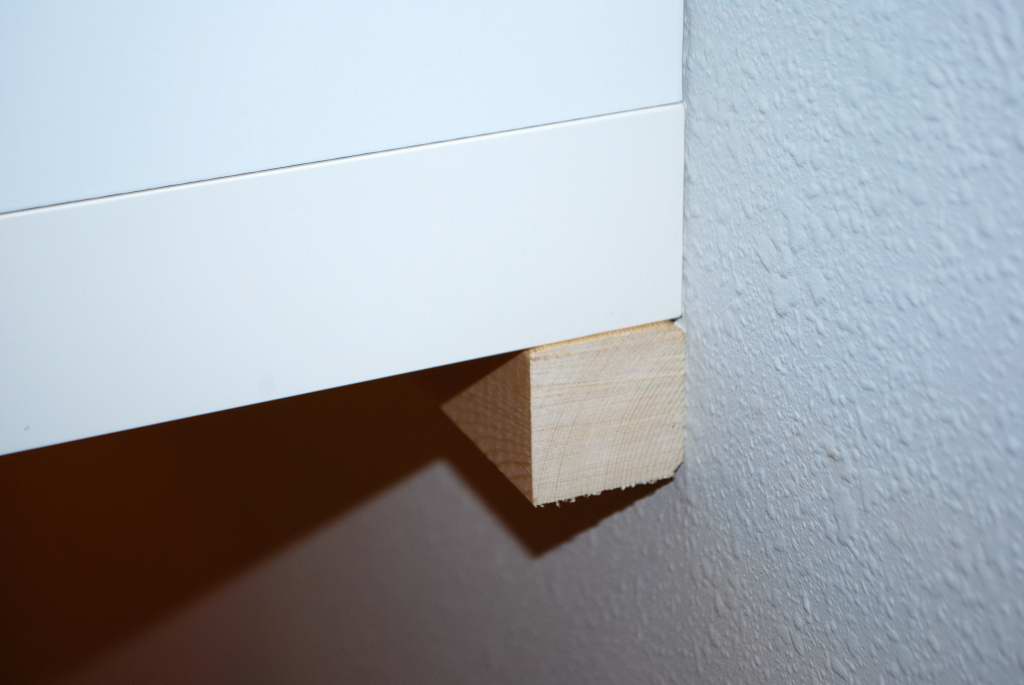 |
| Here you can see the side of the smaller Expedit as it sits on top of its 2" x 2" ledge. |
| Very little in construction turns out to be perfectly flat. In one place, we had to shim the larger Expedit using metal washers. Each 2" x 2" wood ledge was then painted white to match the wall, and this gap under the larger Expedit was completely hidden by the electrical cord conduit for the LED puck lights. |
 |
| As well as installing ledges to bear the weight of the Expedits, we added angle-iron straps which are also lag-bolted into the wall studs. IKEA supplies the brackets visible in the corners above, but given the sheer amount of weight that this unit is going to hold, we decided it needed reinforcements. It is now connected to three separate wall studs using a total of ten lag bolts (it is, afterall, a child's safety that we need to consider here). In the event that we experience a Category 5 hurricane, this wall might get blown down, but I seriously doubt that this Expedit would ever separate from it (we live on the upper Texas coast where hurricanes are routine). |
| The reinforcements and brackets were painted to match the wall they are attached to, making them much less visible. That plus the fact that there will be books and boxes in front of them makes them basically invisible in the finished product. |
 |
| The base unit was a 3-drawer kitchen cabinet measuring about 15" wide by about 30.5" tall. Because we wanted this assemblage to be closer to desk-height instead of counter height, we had to buy one-inch "feet" from a big box hardware store and use them instead of the taller legs it was supposed to come with. It has to have SOME kind of feet under it, or else the bottom drawer will scrape against the floor when opened. This pic was taken as this foot was being hammered into this bottom corner. It's basically a little foot attached to a nail, and is hammered in up to the level of that first ring visible by the fingertips. I don't have my receipt in front of me as I type this, but this was an Akurum cabinet or current equivalent. However when I try to hit the IKEA website to verify this, it gives me "page not found" for Akurum cabinets. The drawer fronts were simply the least expensive plain-white option that IKEA sells for these things. The white shade is close enough to the Expedit that you can't tell the difference. |
 |
| We also installed a corner shelf under the countertop to hold electrical cords and transformers. This is a little shelf we happened to have hanging around un-used. It probably came from Container Store at some point in our past. |
 |
| Nice to have this mess well-hidden under the countertop. |
 |
| We also installed a grommet in the top of the counter for the cords to feed down through. Check out the selection that your big-box hardware store carries, and buy one of those drill coring bits to match the size. Above you can see the black cord from the laptop computer and the two power cords for the IKEA LED lights, as follows: |
 |
| (1) We installed a set of four directional LED puck-lights under the Expedits: three under the large one, and one under the lower small one (brand list at end of post). |
 |
| If you include LED lights, you will face the inevitable headache with the cords. We used wire conduit from the local hardware store and placed the cord components in inconspicuous areas (this piece is scooted right next to the cork board). It does not look unsightly. And it's a teen's room, afterall - no need to be perfect or formal. |


 |
| (2) Every teen room must have a little bit of bling, and how can you not LOVE the color-changing LED light strips that IKEA sells?! This is everyone's favorite part of the final design. Pricey but worth it. We mounted one strip on the top of the larger Expedit for an up-lighting effect. |
 |
| OK, you have to take one more look at the cluttered "BEFORE".... |
 |
| And yippee!!! The "AFTER"!!! :-) Point of clarification: that black screen to the far right of the countertop is the TV sitting on its satellite box, not the computer. Some readers confused that with a computer and wondered why it was pushed so far to the right, but she's actually typing on a laptop computer in front of her. Her bed is on the wall opposite this installation, and so having the TV in that position allows easy viewing from the bed. Also, her chair does raise up higher than shown here, but she prefers to sit lower down like this with her face in front of the laptop screen. Because it's underpinned by the kitchen cabinet visible at photo left, the counter is a little higher than a desk (as I mentioned above), but it's not so much as to cause a height-related problem. See how the Lack shelf unit balances out the one curtain on this window? The window butts right into the corner of the room, so there is no space for another curtain to the left of it. But the Lack now gives it more relational symmetry. |
- Expedit large bookcase in original white (not the newer glossy white because remember, you have to match the lower kitchen cabinet to it) (1)
- Expedit small bookcase (ditto) (1)
- Expedit door inserts (4)
- Lack shelf unit in white (1)
- Numerar countertop, 96", grey side up (1)
- Akurum 15" cabinet or equivalent (1) (get help from the IKEA kitchen staff in selecting it; no link available at the time of this post)
- Galant T-leg (1)
- IMPORTANT: There's a special heavy-duty bracket that mates the Galant leg to the underside of the counter, but I cannot find a URL for it on IKEA's website. Check the same self-serve aisle that contains the legs and you'll likely find it.
- Dioder color light strip (1)
- Inreda spotlight pack (1)
- Kasset boxes in green and orange (2 packs)
- Tyda handles (two 2 packs, for the kitchen cabinet, which is a three-drawer unit, so you'll have one handle left over)
- 2" x 2" x 8' pine strapping (2, with the one under the Expedits cut to two sized pieces)
- 4" lag bolts (for the wooden ledges; about 12)
- 3" lag bolts (for the metal strapping; about 10)
- Angle irons (about 10 in two sizes - smaller to attach the countertop to its wooden ledge, and larger to anchor the Expedits to the wall studs)
- Hole-coring drill bit
- Desk grommet in grey plastic
- One-inch cabinet "feet" (6) (look in the section that also has the felt feet for chairs)
- Miscellaneous minor hardware including various screws and drywall anchors
- Wiremold low-voltage cord concealer components
- Cordless drill (most essential tool)
- Drill bits in various sizes, including grommet-coring bit and screw driver bits
- Hammer
- Socket wrench and/or drill adapter bit for the lag bolts
- Manual screw drivers
- Miter saw or fine-toothed hand saw (to cut the 2" x 2" wooden ledges).
- Pliers
- Measuring tape
- Staple gun (for light cords)
- Probably a few other miscellaneous hand tools, but nothing fancy
- Two physically-capable (strong!) adult DIYers at a minimum, medium skill level.
We close this post by re-iterating that, if you undertake IKEA hacks such as the one shown here, you have to be absolutely sure that your final product is more than safe. Note how much emphasis we placed on securing all the components we installed. We lag-bolted them into multiple two-by-four wall studs to ensure that they would never fall. Someone sitting beneath a fully-loaded elevated Expedit unit could be injured or killed if the mounting hardware were to fail. Consult a professional if you are unsure of your DIY skills.
If you'd like to see any of our previous "start to finish" home improvement blog entries, here they are:
Stock tank gardens from start to finish
Water garden from start to finish
Ollas from start to finish
Garden mirrors from start to finish
You guyz did an excellent Job! I would love to do a similar hack in my sewing room, those expedit bookcases would be perfect for holding my pattern collection and sewing books. The cork board great for reading pattern instructions,love it!
ReplyDeleteYou made a very important point about securing it properly great info indeed!!
That is freaking awesome. you guys rule. lucky daughter and great job parents!
ReplyDeleteTotally Awesome! I wonder if I can do that as an apartment dweller.
ReplyDeleteYou guys did a great job with the teen workstation! It looks great especially with the LED light effects. It is good that you chose to use metal strapping to be assured of the sturdiness of the shelves and cabinets.
ReplyDeleteCarl Patten
This comment has been removed by the author.
ReplyDeleteThis comment has been removed by the author.
ReplyDeleteperde modelleri
ReplyDeletesms onay
mobil ödeme bozdurma
nft nasıl alınır
Ankara Evden Eve Nakliyat
trafik sigortası
DEDEKTOR
web site kurmak
AŞK KİTAPLARI
Smm Panel
ReplyDeleteSmm panel
iş ilanları
İNSTAGRAM TAKİPÇİ SATIN AL
Hırdavatçı Burada
beyazesyateknikservisi.com.tr
servis
tiktok jeton hilesi
nft nasıl alınır
ReplyDeleteminecraft premium
özel ambulans
yurtdışı kargo
en son çıkan perde modelleri
lisans satın al
en son çıkan perde modelleri
uc satın al