Book-ending our "stock tank gardening from start to finish" post, which is often the #1 hit people around the world receive when Googling for information on stock tank or container gardens, I've put together this post regarding a residential rain tank system we just installed here at our humble abode on the upper Texas coast.
As usual, this is a noncommercial post. I provide extensive sourcing here, but no corporate entity has provided any financial consideration in exchange for being cited.
Also as usual, this post expresses personal opinions only, and other folks may have better ideas on how to accomplish these same goals. I write from the perspective of an American suburbanite who is primarily interested in tinkering and achieving greater control over my family's destiny. I often write about conservation-related and urban homesteading topics, but I identify more with self-proclaimed holistic Libertarian farmer Joel Salatin than I do with liberal or "green" or "eco" viewpoints. I inject no moral imperatives into my project choices or descriptions, nor do I appreciate it when folks feel compelled to advocate for things like rain harvesting on moral or social-duty grounds. Conservation measures will only function and be accepted by mainstream society if they are simply a means to a practical and economical end, which I believe this project is.
(1) THE BIG BARRIER TO RAIN HARVESTING.
When researching stock tank gardens a year ago, my challenge was that there was almost no relevant information on the internet - I had to invent a system.
With rain harvesting, I had the opposite problem - an overload of information, an avalanche of greenie propaganda, and umpteen million commercial rain harvesting vendors, applications, and configurations that simply were not relevant to my specific goal, which was a volume-effective but easily-managed system at a rock-bottom price that an ordinary urban or suburban homeowner could DIY in a weekend or two without the need for specialized skills or tools. So once again, I've been forced to think through a new type of application here, but in response to a very different challenge.
To explain the same thing in more concrete terms, right now in America (September 2011), most homeowners utilize one of three types of rain harvesting systems on their properties:
(a) None whatsoever (I estimate about 99.8% of people fall into this category).
(b) Downspout rain barrels in the size range 35 to 65 gallons which won't make a measurable impact on water consumption due to their small size (about 0.1% of people in this category). While these cute little trifles will indeed pay for themselves if used very religiously after being acquired very cheaply at nonprofit municipal distribution prices (suggestion: never pay more than $50 for a really durable barrel), the widespread claim that they will "cut your water bill" is the biggest piece of intelligence-insulting bunk I've heard in years. The average American household uses around 130,000 gallons of potable water annually. How many 55-gallon rain barrels do you suppose a family would have to blow through to even make a microscopic dent in that?! Duh.
(c) Individually-calculated comprehensive systems tens of thousands of gallons in size and costing many thousands of dollars, the use of which is almost always restricted to exotic locations such as the Texas Hill Country (and Bermuda, and Australia) where surface and groundwater resources are insufficient to support human habitation such that rainwater harvesting is the only recourse to the point where people are forced to accept it regardless of inconvenience or price (about 0.1% of people in this category; I recommend you check out Texas A&M University's system design offerings if this applies to you).
Do you see the immediate problem? Right now, the rain-harvesting options available on the market are all or nothing. There is absolutely nothing in the middle, and I'm a middle-way kinda gal.
Make no mistake - I would love to put in a fully-sized system, but how the heck could I do that when I live here?!
(2) OUR CHOSEN TANK MODEL.
So now that I've beaten the all-or-nothing market-insufficiency topic to death, let's dive into a description of the middle-ground system we developed. The tank itself is the most important component of any system. I'll skip the description of my extensive research, but what it came down to was this: I really found only one viable cost effective tank option suitable for our small property, and that was the green 300-gallon Chemtainer 3581. This model offered the following advantages:
(a) Small footprint. As its name suggests, it's 35 inches in diameter and 81 inches high. This means that it can snug up under the eaves of the house. I can fit a number of them in series down the west side of our property where we have a whopping five-foot clearance between the fence and the wall of our house.
(b) Transportable. The Chemtainer 3581's fit nicely into my minivan with second and third row seats removed. Therefore, no delivery charges were incurred. Could also be transported by pickup truck.
(c) Manageable by one person. It weighs only about 90 pounds and can easily be moved around using a hand truck.
(d) Green color. Semi-opaque so as to minimize algae growth inside. Won't look nearly as ugly in a residential setting as some of the more industrial-looking tanks. It's advertised as having ultraviolet stabilizers, which should make it last in outdoor use.
(e) Price. About $313 apiece including tax. Love, love those better-looking shiny metal tanks that some folks use for rainwater harvesting, but those would likely cost at least twice as much as this one. There are many other choices, including some of the coolest tanks ever designed specifically for small residential spaces, but the prices are just jaw-droppingly high.
(f) Locally available. You can see lower Chemtainer prices from distributors advertising on the internet, but what they often won't tell you up front is that they'll tack on an extra $100 or more to ship it to you. I got our Chemtainers from Tank Depot in Houston, which has the lowest prices I've found (talk to the salesman named Will).
(g) Fits through a regular fence gate. This is something to consider very seriously if you're thinking about getting a tank that is larger than this one: even if you do have the space for it, how are you going to get it into your suburban back yard?! Most fence gates are only about 36 inches wide. Anything bigger than that and you're going to have to make special labor or equipment arrangements, which will probably add cost.
(h) Pressure potential. At 81 inches high, there is enough pressure at the bottom hose fitting so that I will not need a pump, thus eliminating more expense and complexity.
(i) Excellent resale potential. This type of tank is sufficiently universal and versatile so that it would easily sell for a great price on Craigslist should we ever need to get rid of the system to move to a new house, or if we decide to upgrade to a larger system. Farmers could use them, people with hunting camps could use them, anyone who needs water storage could use them.
(j) No known permitting issues. I can't comment conclusively on the myriad rules that plague folks living under municipal and homeowner association (HOA) rules, but generally speaking, improvements that are neither visible from the street nor permanently affixed to a property usually don't require a permit. Each of our Chemtainers will be free-standing and not hard-piped, much like ordinary rain barrels (except six times the volume apiece!). My husband, a mechanical engineer, was initially in favor of installing an underground tank, given that we have no space for a large aboveground system. The trouble with that is that the minute we break ground on anything, we are no longer in "DIY" mode - we are in "hire a contractor at exorbitant cost" mode. We would likely need some kind of a permit because a buried tank is a permanent fixture. Furthermore, I worried about disturbing the soil around the foundation of our house. Houston soils are clay-rich and constantly shifting. Perturb those soils in the wrong manner and you may end up with slab problems that cost tens of thousands of dollars to fix. There's also a buoyancy issue with underground tanks in our area: if the ground becomes saturated with rain and a tank happens not to be full of water because someone accidentally left a valve shut, tanks can (and sometimes do) literally fly up out of the ground in a catastrophe of destruction. A buried tank would also require a pump and it's associated electrical work. In sooth, a buried tank would be neither cheap nor idiot proof, which were my two main requirements for this project.
(k) It's apparently made of food-grade polyethylene. It was not our intention to use the Chemtainer to store potable water, but information on the internet says you can do that in some scenarios if you meet certain prerequisites. Again, the more versatility, the better, for re-sale potential and otherwise.
This Chemtainer 3581 appears to be similar to the tank used by Dallas journalist Erin Covert to supply her vegetable garden with rain water irrigation and, in fact, I owe a debt of gratitude to Erin for being such a bleeding-edge trail-blazer in publishing the details of her system. Erin's description is virtually the only other "middle-ground" suburban rain harvesting post I've ever seen published.
However, I have a couple of concerns with Erin's tank configuration:
(a) It's flat-topped, sealed, and does not appear to have a man-way. Even though it has an inlet screen, it WILL gunk up with organic matter and need to be pressure-washed out eventually. I'm not sure how one gains access to this type of tank to do that maintenance (perhaps the top screen can be unscrewed, but that would still provide only a small portal). In contrast, the Chemtainers I bought have both a man-way and an inlet plug:
(b) Limited versatility. Erin's kind of sealed tank appears like it could only be used to collect rainwater from a gutter spout. That might affect it's resale potential.
(c) Erin's tank did not appear to be mounted on a hard base. It does appear properly leveled from the photo, but I wonder how long it will remain that way on bare soil. I'll address the importance of this issue in more detail in the BUILD SEQUENCE section below.
But what I did like better about Erin's tank is this:
(a) It has two options for overflow which means manifolding would be easier. Erin's tank has both a threaded side port, plus an alternate overflow notch cut into the top. If the side port is used for manifolding, excess water can instead be directed out that top notch (not ideal, but it's an option). The Chemtainers we bought have just the side overflow port. If we connect tanks together using that port, we'd tie up the only available extra port and then we would have to find another way to vent excess water efficiently.
(3) BUILD SEQUENCE.
OK, now for the fun part - how did we actually install our tanks, and why did we do it the way we did?
(a) Initial sizing and siting. We were constrained by budget as well as the small size of our yard. Whereas many internet sources will advise you to budget somewhere between $5,000 and $10,000 for a sized rainwater system, I was intent on having our entry-level system come in well below $1,000. For this reason, my husband and I scoped it so that we could put in an effective smaller system but then build upon it via simple replication of effort in the future, if we see fit.
There was another compelling reason to consider a smaller system. In our type of climate, our objective is not large-scale rainwater collection for long-term storage followed by subsequent incremental consumption during dry seasons, as is the typical scenario in more arid regions of the country. We have rainfall all year round* and an 11-month growing season. Therefore, our return on investment (ROI) is actually maximized if we continually make smaller rainfall collections with the intention of consuming each batch of collected rainwater as rapidly as possible. I explain further in the ECONOMICS section below. And for smaller rapidly-consumed collections, smaller tanks can suffice.
(*this assumes we're not continually in conditions of extremity such as those experienced in 2011, when much of Texas experienced its most severe drought in recorded history).
So there you have the starting configuration: one 300-gallon tank flanking each side of the house.
(b) Preparing the tank base. This is an important safety issue: if you choose a tall skinny tank, do not erect it on a surface that isn't completely level. When full of water, each 300 gallon Chemtainer will weigh about 2,600 pounds (!!). Neither polyethylene (plastic) nor metal storage tanks are designed to withstand the type of lateral shear forces that they would experience if they were filled while leaning like this:
We initially considered laying a flat poured concrete pad for each tank, but (a) that's expensive and (b) our west five-foot side yard is encumbered by an underground easement, so anything we put there has to be non-permanent. Therefore we settled upon properly set concrete pavers:
OK, what about that tap at the bottom?
And how is the rainwater diversion accomplished from the gutter near the top? This can be done a number of ways, with two suggestions as follows.
Option A - insert a drop point right above the tank:
Option B - A hard gutter connection. Tank Depot of Houston actually has two demo systems set up at their sales warehouse using this exact Chemtainer model (a fact I did not know until I drove over there to pick my first one up). They invented a different adapter system but the idea is the same - it's home-made and they got all their pieces at a big box hardware store:
(4) ECONOMICS.
Final cost for this system of two tanks was as follows (tax included):
Most local water utilities in Texas bill according to a complicated usage formula that makes sewer charges contingent upon water use, such that if you only look at your "water usage" charges, you're not seeing the full extent of what you actually pay for water. But for simplicity sake, roughly rounded, you can consider that each gallon of municipal water currently costs you about $0.01 (which is the deal of the century, by the way). Therefore, if you use a system such as my husband and I have designed above, by the time you cycle through 126 uses of your tanks, they will have paid for themselves.
Does 126 uses sound like a lot? That's about one full capacity use per week for 2.4 years, or one use every two weeks for 4.8 years. It doesn't sound like that much when considered from that perspective, does it? Unless I suffer an untimely death, dismemberment, or divorce, odds are very good that these two tanks will pay for themselves (and in fact, if any of those three fates befall me, the economics of my tanks will be the least of my worries anyway). After that point, they will effectively MAKE money for us.
Plus, there are two other very important indirect cost considerations to consider here:
(a) Municipal water rates are expected to continue increasing sharply. In the future, at a bare minimum, I expect to see aggressive drought-pricing, which is the only real way that water authorities are going to be able to compel genuine conservation during water emergencies (see (b) below). Right now, many municipalities are still not really using pricing schemes that truly promote conservation by imposing progressive rates, as the Texas Water Development Board is pressing them to do, so that will change. And the more expensive municipal water supply becomes, the faster a residential rain tank system will pay for itself.
(b) Chronic water rationing negatively impacts both homestead investment and quality of life. That deal-of-the-century $0.01 per gallon?? That only applies if you are correspondingly allowed to actually use the gallons that you need, which is becoming an increasingly-rare scenario. We live in an area where we are legally restricted or outright prohibited on a more-or-less continual basis from using potable water for exterior uses - that's our "new normal" these days. In fact, one can look at rain tank system costs from that very perspective: our new system cost 1.5 times the financial penalty that League City charges violators for unauthorized outdoor water use. Doesn't sound like much when put that way.
Parts of Galveston County were placed under restrictions that categorically prohibited ALL landscape watering for portions of this year. How might you perceive of the value-add provided by a $750 home rain harvesting system when you have the potential to lose $2,000 or $5,000 worth of your property's landscaping because you can't legally water it any other way? Verily, the assessment of whether rainwater harvesting is worth the up-front cost is not necessarily as simple as a cost-per-storage gallon evaluation might first suggest.
(5) SUMMARY
So there you have it: the birth of our first two harvesting tanks, and the reasons why they were conceived.
So... will having a 655 gallon total rain water storage on our property meet all of our irrigation needs?
Not by a suburban mile, but it's a solid start. I can use these tanks on an ongoing basis for our vegetable gardening, which we do year-round, and I can use the system in drought emergencies (which are expected to continue) to dole out precious water to trees and shrubs.
And in the future, after we complete longer-term planned xeriscaping and drip-irrigation ambitions, who knows? Maybe we will eventually get off the agua-grid, at least where outdoor uses are concerned.
And oh, incidentally, we can also use these tanks during a hurricane for emergency water storage. Who can forget City of Houston's lack of water pressure immediately following Hurricane Ike when it's Lynchburg Reservoir lost power for the pumps that supply water to two regional distribution plants? The only water we had for a while during Ike was what we stored in our bathtub.
This post, like our stock tank post, will be periodically appended with updates inserted below, as we work with these new assets and refine our knowledge and efficiencies.
Thanks for reading!
alison.journey - at - gmail
***Update September 22, 2011***
Two additional observations:
Hoses need to be good quality. The tanks are now functioning fabulously, but I'm finding that I need better-quality hoses for them. Initially I thought "light duty" hoses would suffice, but because the pressure from gravity draining is not quite as high as what is produced by a tap, the "light duty" (read: cheap) hoses kink very easily and need to be straightened frequently. I'll update when I discover a good cost-effective unkinkable (or less-kinkable) hose.
First nugget of empirical wisdom on rainfall vs. harvest rates: Our first 0.8 inches of rainfall yielded about 550 gallons of water harvested. The calculations presented on the roof trace figure in section (3) above are not exact and don't take into account such factors as how much the roof singles absorb, wind-driven effects, etc. During that 0.8-inch rainfall event, our east tank overflowed whereas our west tank caught only about 200 gallons. This was not surprising given the differences in roof areas drained (and also given the fact that I had forgotten to stuff a tennis ball into one of the existing western downspouts!). The next tank I place will be a manifolded twin on the east side of the house.
***Update September 24, 2011***
It occurred to me this morning that I haven't provided many ideas on the practical use of rain tanks, once they are finally full of harvested rain. This information below may be of use to newbies who are wondering, "Even if I do install some tanks in my back yard, will I ever use them??" The answer is yes you will, assuming you are at least mildly inclined to step outside your door. It's easy, as the following section describes.
I mentioned above that the tank tap includes a garden hose adapter, but that the passive water pressure is not as high as what the regular hose tap on the side of your house will provide. Therefore, the rain tanks are not really useful for running above-ground lawns sprinklers (the kind that go chink! chink! chink! chink!) and are best used for hand watering and drip irrigation.
Drip irrigation is extremely important for trees. These days, the rallying cry around drought-stricken Texas has been "forget your lawn - save your trees!" As this Houston Chronicle article details, trees need watering that is slow and deep so that run-off and evaporation are minimized. A rain tank is absolutely ideal for that type of application. Simply throw the hose beneath one tree at a time and open the tap for slow release.
You'll notice as well that there's mulch at the base of this tree. Mulch is advocated as a way to slow evaporation and protect plant roots from heat. During the Summer of Hell here in Houston, we actually went one step farther, laying flat rocks around the base of plants. I haven't seen this idea advocated anywhere, but it makes intuitive sense to me and yes, I have noticed that it does slow evaporation by limiting the amount of soil surface available to release moisture:
As usual, this is a noncommercial post. I provide extensive sourcing here, but no corporate entity has provided any financial consideration in exchange for being cited.
Also as usual, this post expresses personal opinions only, and other folks may have better ideas on how to accomplish these same goals. I write from the perspective of an American suburbanite who is primarily interested in tinkering and achieving greater control over my family's destiny. I often write about conservation-related and urban homesteading topics, but I identify more with self-proclaimed holistic Libertarian farmer Joel Salatin than I do with liberal or "green" or "eco" viewpoints. I inject no moral imperatives into my project choices or descriptions, nor do I appreciate it when folks feel compelled to advocate for things like rain harvesting on moral or social-duty grounds. Conservation measures will only function and be accepted by mainstream society if they are simply a means to a practical and economical end, which I believe this project is.
(1) THE BIG BARRIER TO RAIN HARVESTING.
When researching stock tank gardens a year ago, my challenge was that there was almost no relevant information on the internet - I had to invent a system.
With rain harvesting, I had the opposite problem - an overload of information, an avalanche of greenie propaganda, and umpteen million commercial rain harvesting vendors, applications, and configurations that simply were not relevant to my specific goal, which was a volume-effective but easily-managed system at a rock-bottom price that an ordinary urban or suburban homeowner could DIY in a weekend or two without the need for specialized skills or tools. So once again, I've been forced to think through a new type of application here, but in response to a very different challenge.
To explain the same thing in more concrete terms, right now in America (September 2011), most homeowners utilize one of three types of rain harvesting systems on their properties:
(a) None whatsoever (I estimate about 99.8% of people fall into this category).
(b) Downspout rain barrels in the size range 35 to 65 gallons which won't make a measurable impact on water consumption due to their small size (about 0.1% of people in this category). While these cute little trifles will indeed pay for themselves if used very religiously after being acquired very cheaply at nonprofit municipal distribution prices (suggestion: never pay more than $50 for a really durable barrel), the widespread claim that they will "cut your water bill" is the biggest piece of intelligence-insulting bunk I've heard in years. The average American household uses around 130,000 gallons of potable water annually. How many 55-gallon rain barrels do you suppose a family would have to blow through to even make a microscopic dent in that?! Duh.
(c) Individually-calculated comprehensive systems tens of thousands of gallons in size and costing many thousands of dollars, the use of which is almost always restricted to exotic locations such as the Texas Hill Country (and Bermuda, and Australia) where surface and groundwater resources are insufficient to support human habitation such that rainwater harvesting is the only recourse to the point where people are forced to accept it regardless of inconvenience or price (about 0.1% of people in this category; I recommend you check out Texas A&M University's system design offerings if this applies to you).
Do you see the immediate problem? Right now, the rain-harvesting options available on the market are all or nothing. There is absolutely nothing in the middle, and I'm a middle-way kinda gal.
Make no mistake - I would love to put in a fully-sized system, but how the heck could I do that when I live here?!
 |
| Suburban postage stamp. There is no room here for any kind of a sized rain tank or cistern system. It's a great house. We built it ourselves, we love it, but we were unable to buy a large lot like we wanted, so now we have this tiny yard into which stuff has to be inserted with a shoe-horn. We can't put big tanks here if we want to maintain an even-remotely-appropriate suburban aesthetic. Sized tanks would dominate what little space is available and we'd end up looking like a Pasadena petrochemical tank farm instead of a home. |
 |
| So why bother with rain harvesting on a postage stamp-sized yard? Because it takes a lot of water to grow these babies (organic onion crop, May 2011; pic from our stock tank gardening post)... |
 |
| ... and also because, even in a good year, landscaping usually needs supplementary irrigation - rain alone is not optimal, even for the partly-native and all-drought-tolerant plants seen here. The smaller the yard, the more vital the landscaping becomes for privacy. |
So now that I've beaten the all-or-nothing market-insufficiency topic to death, let's dive into a description of the middle-ground system we developed. The tank itself is the most important component of any system. I'll skip the description of my extensive research, but what it came down to was this: I really found only one viable cost effective tank option suitable for our small property, and that was the green 300-gallon Chemtainer 3581. This model offered the following advantages:
(a) Small footprint. As its name suggests, it's 35 inches in diameter and 81 inches high. This means that it can snug up under the eaves of the house. I can fit a number of them in series down the west side of our property where we have a whopping five-foot clearance between the fence and the wall of our house.
 |
| Chemtainers look like this. Dry fit (pun intended) in our west side yard (if you could call this miserable little space a "side yard"). You can also see my original (and favorite) small rain barrel in the foreground which, incidentally, I also did extensive research regarding. It is made in Canada and goes by a variety of re-plate names including Norseman Systern (distributed last year during the City of Houston composter and rain tank sale), Orbis (sold by Sears), and Aqua-Flo (sold by Woodland Direct, which also sells many other brands). |
 |
| Sweet!!! Why would anyone drive anything but a minivan?! I can't tell you how many delivery charges I've saved over the years!! |
(d) Green color. Semi-opaque so as to minimize algae growth inside. Won't look nearly as ugly in a residential setting as some of the more industrial-looking tanks. It's advertised as having ultraviolet stabilizers, which should make it last in outdoor use.
(e) Price. About $313 apiece including tax. Love, love those better-looking shiny metal tanks that some folks use for rainwater harvesting, but those would likely cost at least twice as much as this one. There are many other choices, including some of the coolest tanks ever designed specifically for small residential spaces, but the prices are just jaw-droppingly high.
(f) Locally available. You can see lower Chemtainer prices from distributors advertising on the internet, but what they often won't tell you up front is that they'll tack on an extra $100 or more to ship it to you. I got our Chemtainers from Tank Depot in Houston, which has the lowest prices I've found (talk to the salesman named Will).
(g) Fits through a regular fence gate. This is something to consider very seriously if you're thinking about getting a tank that is larger than this one: even if you do have the space for it, how are you going to get it into your suburban back yard?! Most fence gates are only about 36 inches wide. Anything bigger than that and you're going to have to make special labor or equipment arrangements, which will probably add cost.
(h) Pressure potential. At 81 inches high, there is enough pressure at the bottom hose fitting so that I will not need a pump, thus eliminating more expense and complexity.
 |
| Shoots a good stream. |
(j) No known permitting issues. I can't comment conclusively on the myriad rules that plague folks living under municipal and homeowner association (HOA) rules, but generally speaking, improvements that are neither visible from the street nor permanently affixed to a property usually don't require a permit. Each of our Chemtainers will be free-standing and not hard-piped, much like ordinary rain barrels (except six times the volume apiece!). My husband, a mechanical engineer, was initially in favor of installing an underground tank, given that we have no space for a large aboveground system. The trouble with that is that the minute we break ground on anything, we are no longer in "DIY" mode - we are in "hire a contractor at exorbitant cost" mode. We would likely need some kind of a permit because a buried tank is a permanent fixture. Furthermore, I worried about disturbing the soil around the foundation of our house. Houston soils are clay-rich and constantly shifting. Perturb those soils in the wrong manner and you may end up with slab problems that cost tens of thousands of dollars to fix. There's also a buoyancy issue with underground tanks in our area: if the ground becomes saturated with rain and a tank happens not to be full of water because someone accidentally left a valve shut, tanks can (and sometimes do) literally fly up out of the ground in a catastrophe of destruction. A buried tank would also require a pump and it's associated electrical work. In sooth, a buried tank would be neither cheap nor idiot proof, which were my two main requirements for this project.
(k) It's apparently made of food-grade polyethylene. It was not our intention to use the Chemtainer to store potable water, but information on the internet says you can do that in some scenarios if you meet certain prerequisites. Again, the more versatility, the better, for re-sale potential and otherwise.
This Chemtainer 3581 appears to be similar to the tank used by Dallas journalist Erin Covert to supply her vegetable garden with rain water irrigation and, in fact, I owe a debt of gratitude to Erin for being such a bleeding-edge trail-blazer in publishing the details of her system. Erin's description is virtually the only other "middle-ground" suburban rain harvesting post I've ever seen published.
 |
| Screengrab of Erin's tank. |
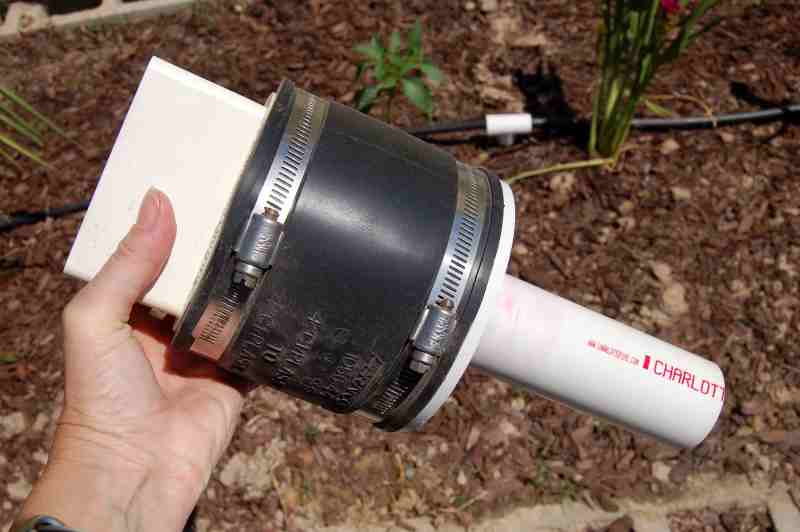
(a) It's flat-topped, sealed, and does not appear to have a man-way. Even though it has an inlet screen, it WILL gunk up with organic matter and need to be pressure-washed out eventually. I'm not sure how one gains access to this type of tank to do that maintenance (perhaps the top screen can be unscrewed, but that would still provide only a small portal). In contrast, the Chemtainers I bought have both a man-way and an inlet plug:
 |
| The smaller inlet cover is pressure-screwed into place. The larger man-way cover is threaded. I don't recommend that anyone ever physically enter one of these tanks (= safety issue), but one could incline the tank on its side and reach an arm inside to pressure-wash it out, for instance. One person working alone could handle this task. |
(c) Erin's tank did not appear to be mounted on a hard base. It does appear properly leveled from the photo, but I wonder how long it will remain that way on bare soil. I'll address the importance of this issue in more detail in the BUILD SEQUENCE section below.
But what I did like better about Erin's tank is this:
(a) It has two options for overflow which means manifolding would be easier. Erin's tank has both a threaded side port, plus an alternate overflow notch cut into the top. If the side port is used for manifolding, excess water can instead be directed out that top notch (not ideal, but it's an option). The Chemtainers we bought have just the side overflow port. If we connect tanks together using that port, we'd tie up the only available extra port and then we would have to find another way to vent excess water efficiently.
(3) BUILD SEQUENCE.
OK, now for the fun part - how did we actually install our tanks, and why did we do it the way we did?
(a) Initial sizing and siting. We were constrained by budget as well as the small size of our yard. Whereas many internet sources will advise you to budget somewhere between $5,000 and $10,000 for a sized rainwater system, I was intent on having our entry-level system come in well below $1,000. For this reason, my husband and I scoped it so that we could put in an effective smaller system but then build upon it via simple replication of effort in the future, if we see fit.
 |
| Here again is our house footprint, only this time I've divided up the two rear sections of roof to show volume calculations and locations of existing downspouts (the entire gutter system is actually contiguous, but I've shown the main roof areas that drain to each, even though there's cross-communication via the gutters). But there's no need to get this fancy or detailed - you can assume that any appreciable rainfall running off any typical suburban roof will result in substantially full 300-gallon tanks. In our case, two tanks should be completely filled by every rainfall event of about one half-inch or greater. |
 |
| Here's a close-up showing present tanks and potential future placement of supplementary tanks to optimize collection from east and west sides of the roof. |
(*this assumes we're not continually in conditions of extremity such as those experienced in 2011, when much of Texas experienced its most severe drought in recorded history).
So there you have the starting configuration: one 300-gallon tank flanking each side of the house.
(b) Preparing the tank base. This is an important safety issue: if you choose a tall skinny tank, do not erect it on a surface that isn't completely level. When full of water, each 300 gallon Chemtainer will weigh about 2,600 pounds (!!). Neither polyethylene (plastic) nor metal storage tanks are designed to withstand the type of lateral shear forces that they would experience if they were filled while leaning like this:
 |
| To make my point, I temporarily placed this tank on a concrete storage slab that abuts our house. If I had placed it on a concrete patio, the same effect would occur: it's leaning away from the house. This is because all properly-constructed outdoor concrete areas should slope away from the house so they don't allow water to accumulate against the foundation, which could lead to structural problems. |
 |
| First we ripped out a section of lawn sod and roughly leveled the pavers in a dry-fit. You can see just how sloped that adjacent storage pad is relative to the flat pavers. Because the tanks are 35" in diameter, we settled on 12 inch square concrete pavers (36" x 36"), which are available for just over $1 apiece at big box hardware stores. |
 |
| We then removed the roughly-fit pavers , poured out the paver mix, and leveled it by dragging a long level across the top. We used two to three bags of mix for each base. |
 |
| After leveling the pavers in the mix, we locked each base in place using the kind of edging that can be staked. We used two courses (18 pavers total underneath each tank) to raise the tap above grade. |
 |
| We angled the tap toward an outer corner of the paver pad, and surrounded it with landscape rocks so that the lawn crew will hopefully not smash into it. Eventually I'm going to add more plants and landscaping around it to improve the appearance. Yes, I bought that one ceramic plant pot to match the exact shade of the tank. |
 |
| More complicated than we'd like it, but remember, this is not an off-the-shelf consumer item. Take a copy of this photo to the hardware store with you if you're going to buy this stuff. |
Option A - insert a drop point right above the tank:
 |
| The tank is so tall that there's only about nine inches of clearance between the bottom of the gutter and the top of the tank. A common dremel tool can be used to cut a hole in an existing gutter. (Heartfelt thanks to my husband for tolerating and helping with my homesteading projects, which are often not to his personal taste). |
 |
| One of these drop outlets is then inserted into the hole and screwed/sealed into place. |
 |
| Action shot - it actually rained the day after we installed this! My husband inserted a short length of downspout with a strainer basket in the drop point. I still need to add a screen in both the top of the tank and its overflow port to exclude mosquitoes. |
 |
| High-tech plugs were added to the inlet ports for the original downspouts in order to divert water to the new tank drop point. (It looks like it's just sitting there and would float away in the first rain storm, but it is actually wedged in place). |
 |
| This is the Chemtainer they were using for passive demonstration (the tank was connected to a garden dripline). Geez, I just noticed while writing this that they used cinderblocks for a base instead of pavers!! That might have been both easier and cheaper!! |
 |
| They put together a top adapter mechanism that uses an extension of rain gutter. |
 |
| Here's a close-up of the adapter. |
 |
| And just for completeness, here's the tank they are using to demonstrate active distribution - they have a pump assembly hooked up to this one. |
Final cost for this system of two tanks was as follows (tax included):
- Two 300 gallon Chemtainer 3581's: $626
- Double paver base, paver sand, paver edging, and stakes for the base beneath each tank: approx. $75
- Gutter and valve fittings: approx. $55
- Sweat equity required to set up the tanks: Priceless.
- TOTAL: approx. $756 for 600 storage gallons, or $1.26 per storable gallon.
Most local water utilities in Texas bill according to a complicated usage formula that makes sewer charges contingent upon water use, such that if you only look at your "water usage" charges, you're not seeing the full extent of what you actually pay for water. But for simplicity sake, roughly rounded, you can consider that each gallon of municipal water currently costs you about $0.01 (which is the deal of the century, by the way). Therefore, if you use a system such as my husband and I have designed above, by the time you cycle through 126 uses of your tanks, they will have paid for themselves.
Does 126 uses sound like a lot? That's about one full capacity use per week for 2.4 years, or one use every two weeks for 4.8 years. It doesn't sound like that much when considered from that perspective, does it? Unless I suffer an untimely death, dismemberment, or divorce, odds are very good that these two tanks will pay for themselves (and in fact, if any of those three fates befall me, the economics of my tanks will be the least of my worries anyway). After that point, they will effectively MAKE money for us.
Plus, there are two other very important indirect cost considerations to consider here:
(a) Municipal water rates are expected to continue increasing sharply. In the future, at a bare minimum, I expect to see aggressive drought-pricing, which is the only real way that water authorities are going to be able to compel genuine conservation during water emergencies (see (b) below). Right now, many municipalities are still not really using pricing schemes that truly promote conservation by imposing progressive rates, as the Texas Water Development Board is pressing them to do, so that will change. And the more expensive municipal water supply becomes, the faster a residential rain tank system will pay for itself.
(b) Chronic water rationing negatively impacts both homestead investment and quality of life. That deal-of-the-century $0.01 per gallon?? That only applies if you are correspondingly allowed to actually use the gallons that you need, which is becoming an increasingly-rare scenario. We live in an area where we are legally restricted or outright prohibited on a more-or-less continual basis from using potable water for exterior uses - that's our "new normal" these days. In fact, one can look at rain tank system costs from that very perspective: our new system cost 1.5 times the financial penalty that League City charges violators for unauthorized outdoor water use. Doesn't sound like much when put that way.
 |
| Courtesy of Galveston County Daily News, this photo and caption appeared on the same day I published this blog post, along with a report which claims that meeting future water needs is going to cost Texas billions of dollars. Again, all signs (pun intended) point to profound increases in municipal water rates. |
(5) SUMMARY
So there you have it: the birth of our first two harvesting tanks, and the reasons why they were conceived.
 |
| East tank. As I mentioned, I will continue to work on aesthetic improvements, and will probably eventually screen this entire tank and the one which may be placed to the adjacent right of it in the future. |
 |
| West tank. Level, plumb and true, but still in need of trimming-out and spiffing-up as of the date of this post. |
 |
| Like an old war horse put out to pasture, the original Systern rain barrel has now been moved to the patio, where it will see light duty supplying rainwater to potted plants. |
Not by a suburban mile, but it's a solid start. I can use these tanks on an ongoing basis for our vegetable gardening, which we do year-round, and I can use the system in drought emergencies (which are expected to continue) to dole out precious water to trees and shrubs.
And in the future, after we complete longer-term planned xeriscaping and drip-irrigation ambitions, who knows? Maybe we will eventually get off the agua-grid, at least where outdoor uses are concerned.
And oh, incidentally, we can also use these tanks during a hurricane for emergency water storage. Who can forget City of Houston's lack of water pressure immediately following Hurricane Ike when it's Lynchburg Reservoir lost power for the pumps that supply water to two regional distribution plants? The only water we had for a while during Ike was what we stored in our bathtub.
 |
| Art shot, looking down into tank from the top hatch, with just a bit of water in the bottom. When the water splashes in from a height of 81 inches above the bottom, it sounds like coins dropping into a piggy bank. |
Thanks for reading!
alison.journey - at - gmail
***Update September 22, 2011***
Two additional observations:
Hoses need to be good quality. The tanks are now functioning fabulously, but I'm finding that I need better-quality hoses for them. Initially I thought "light duty" hoses would suffice, but because the pressure from gravity draining is not quite as high as what is produced by a tap, the "light duty" (read: cheap) hoses kink very easily and need to be straightened frequently. I'll update when I discover a good cost-effective unkinkable (or less-kinkable) hose.
First nugget of empirical wisdom on rainfall vs. harvest rates: Our first 0.8 inches of rainfall yielded about 550 gallons of water harvested. The calculations presented on the roof trace figure in section (3) above are not exact and don't take into account such factors as how much the roof singles absorb, wind-driven effects, etc. During that 0.8-inch rainfall event, our east tank overflowed whereas our west tank caught only about 200 gallons. This was not surprising given the differences in roof areas drained (and also given the fact that I had forgotten to stuff a tennis ball into one of the existing western downspouts!). The next tank I place will be a manifolded twin on the east side of the house.
***Update September 24, 2011***
It occurred to me this morning that I haven't provided many ideas on the practical use of rain tanks, once they are finally full of harvested rain. This information below may be of use to newbies who are wondering, "Even if I do install some tanks in my back yard, will I ever use them??" The answer is yes you will, assuming you are at least mildly inclined to step outside your door. It's easy, as the following section describes.
I mentioned above that the tank tap includes a garden hose adapter, but that the passive water pressure is not as high as what the regular hose tap on the side of your house will provide. Therefore, the rain tanks are not really useful for running above-ground lawns sprinklers (the kind that go chink! chink! chink! chink!) and are best used for hand watering and drip irrigation.
Drip irrigation is extremely important for trees. These days, the rallying cry around drought-stricken Texas has been "forget your lawn - save your trees!" As this Houston Chronicle article details, trees need watering that is slow and deep so that run-off and evaporation are minimized. A rain tank is absolutely ideal for that type of application. Simply throw the hose beneath one tree at a time and open the tap for slow release.
 |
| TRICKLE YOUR TREES: Hose delivering precious water to a twelve-foot Italian cypress from our east rain tank this morning. Based on the Houston Chronicle article mentioned above, this tree probably "needs" something like 50 gallons per week - but I'm guessing it could survive on much less than that. Assuming each tree "needs" between 50 and 100 gallons per week, I could consume each batch of collected rainwater just by irrigating five to ten trees around my property. |
 |
| Tomato tank, with soil shield. We think it looks pretty as well as reducing evaporation. These tomatoes have been in the ground for about two weeks and are watered daily, almost exclusively with rain water from the west tank. During our spring crop, we harvested about 500 cherry tomatoes out of this stock tank, and they were excellent! Further info is available in our stock tank garden post. |
Thank you for a well-written and documented account. My initial reference for rainwater harvesting was "The Texas Manual on Rainwater Harvesting" (pdf), it seems to focus on larger systems, but there might be useful information there for some of your readers.
ReplyDeleteDid you consider installing first-flush diverters or pre-filters to help keep debris out of the tanks? This might allow you to use the tanks to supply drip irrigation systems with less risk of clogging.
I also meant to ask - were you able to realize any tax breaks (sales or property) from local or state government for your efforts? I have read that non-residential properties can claim some tax-exemptions for rainwater harvesting, but it's not clear to me if there are any benefits for residential systems.
ReplyDeleteReally nice information you had posted. Its very informative and definitely it will be useful for many people
ReplyDeleteBest Architects in Chennai
Turnkey Interior Contractors in Chennai
Interior Contractors in Chennai
Architecture Firms in Chennai